Getting started with MOSAIC
MOSAIC is a step-sequenced multi-effects plug-in from E8 Audio Labs. You put it on a track that already has sound, and you paint effects onto a 32-step grid. The audio changes step by step, in time with your song: a beat repeats for one beat, a filter opens on the off-beats, a granular cloud blooms for half a bar and is gone.
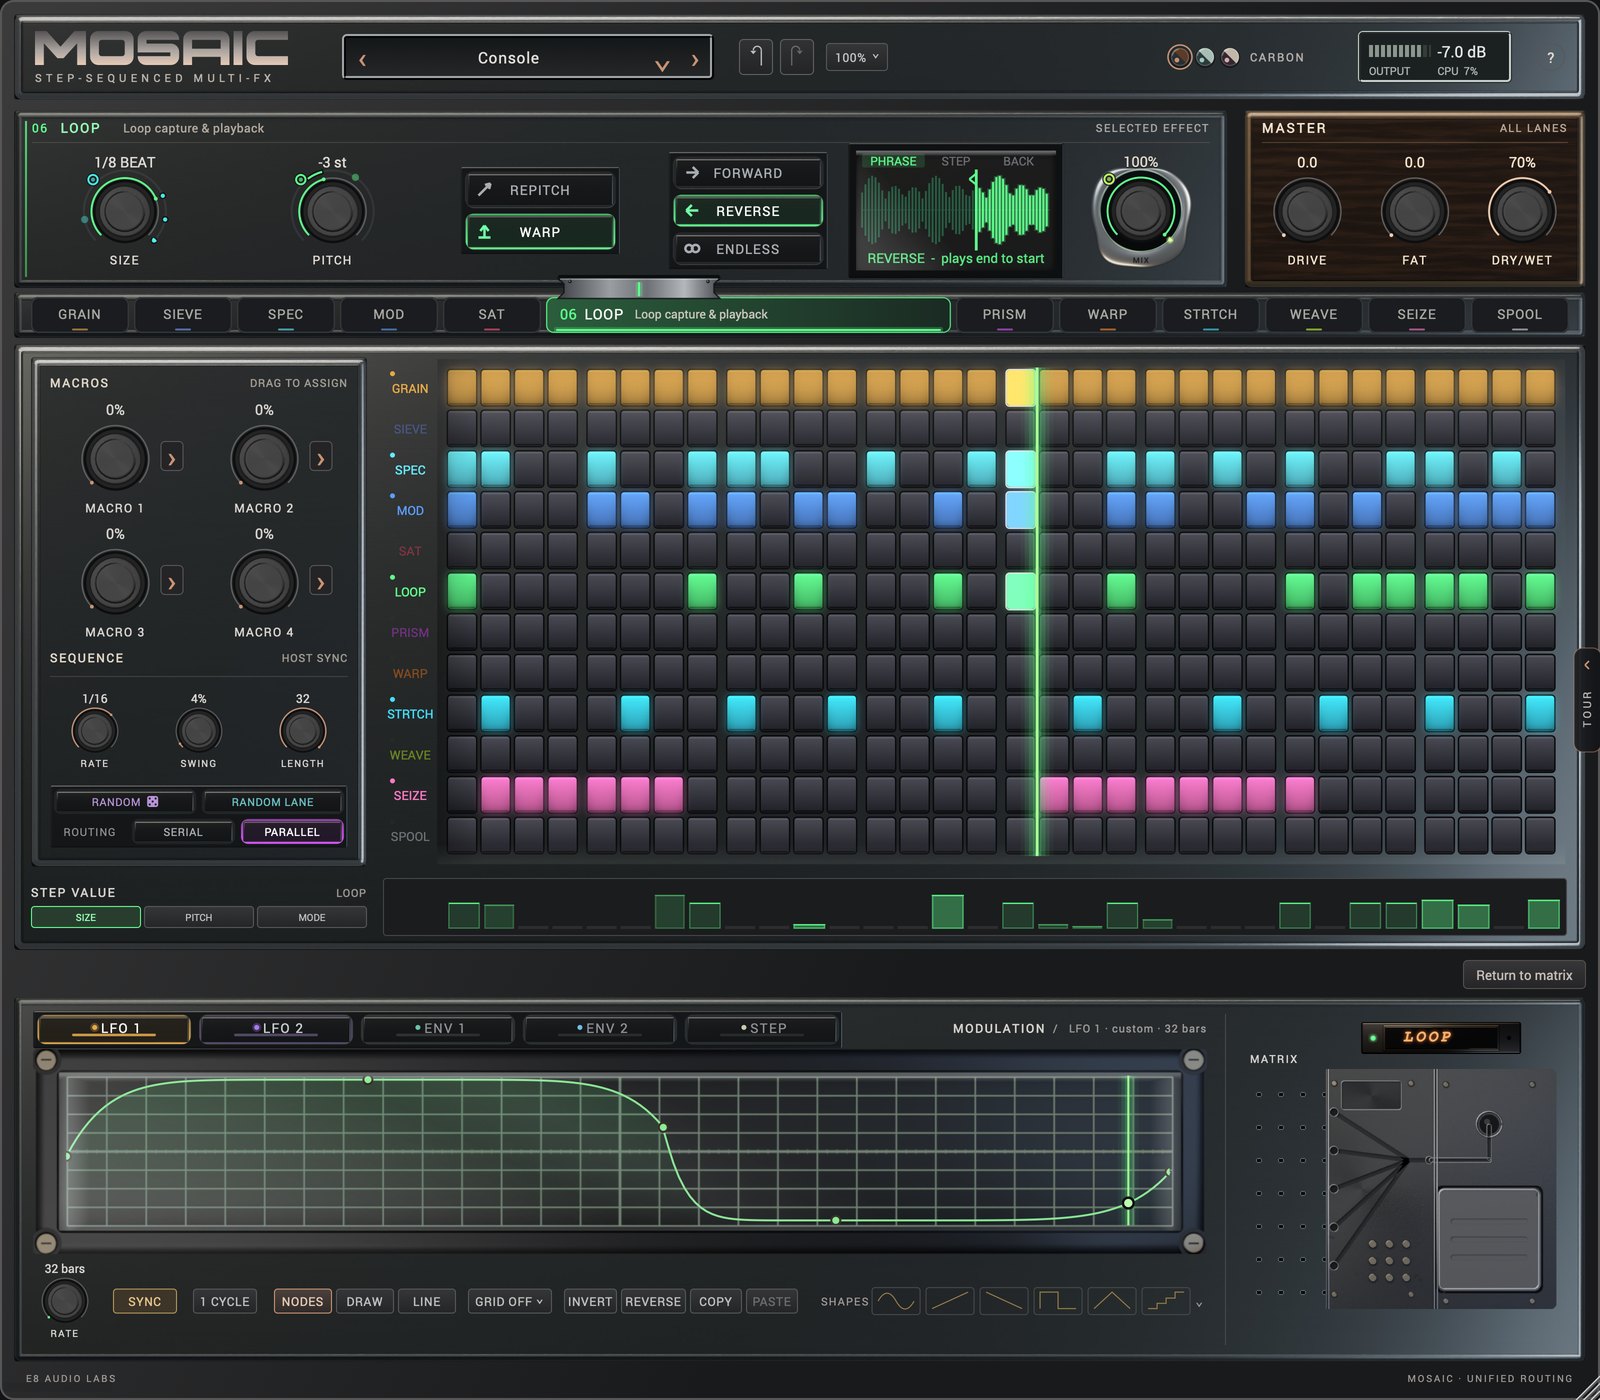
This guide gets you from the installer to a first pattern of your own. The tutorials then take you through hands-on recipes, the technical guide explains how the engine works, and the glossary describes every control.
What you need
| macOS | Windows | |
|---|---|---|
| System | macOS 11.0 or later, Intel or Apple Silicon (universal binary) | 64-bit Windows 10 or 11, Intel or AMD |
| Formats | Audio Unit, VST3, CLAP, standalone app | VST3, CLAP, standalone app |
| Host | Any DAW that loads one of those formats. MOSAIC is an audio effect, listed under E8 Audio Labs. | Same; the standalone app also runs without a DAW. |
MOSAIC is activated with an E8 Audio Labs account that holds a MOSAIC licence. Until it is activated it passes audio through unprocessed, so nothing in a project is ever at risk.
Install
macOS. Open MOSAIC-0.1.3.pkg and follow the steps. The package is signed and notarized. It installs the AU, VST3 and CLAP plug-ins for every user of the Mac, the standalone app in Applications, and the 144 factory presets in ~/Documents/MOSAIC/Presets. It also removes any older MOSAIC bundles so your host lists exactly one.
Windows. Run MOSAIC-0.1.3-Windows-x64.exe and follow the steps; it needs administrator rights. It installs the VST3 and CLAP plug-ins in C:\Program Files\Common Files, the standalone app in C:\Program Files\E8 Audio Labs\MOSAIC, and the 144 factory presets in Documents\MOSAIC\Presets. The Windows installer is not yet publisher-signed: if SmartScreen appears, choose More info, then Run anyway.
Then rescan plug-ins in your DAW if it does not list MOSAIC straight away:
- Ableton Live: Settings → Plug-Ins → enable VST3 (and Audio Units on Mac) → Rescan. On the Mac, hold Alt while clicking Rescan for a full rescan.
- Logic Pro: restart Logic. If MOSAIC is missing: Settings → Plug-in Manager → Reset & Rescan.
- Reaper, Bitwig, FL Studio, Cubase, Studio One: rescan the VST3 or CLAP folder from the preferences.
Presets you save yourself live next to the factory ones and are never removed by an installer or an uninstall.
Activate
The first time you open MOSAIC it shows an Activation required card over its interface, with your computer’s name and the line “Your project and settings are safe. Audio passes through unprocessed.”
- Press ACTIVATE. The card changes to Waiting for approval and shows an eight-character code in the form
XXXX-XXXX. Your browser opense8audiolabs.com/activatewith that code filled in. If no browser appeared, press OPEN BROWSER AGAIN, or type the address on any device. - Sign in if the page asks you to, check that the code and the computer name match what MOSAIC shows, and press Confirm activation.
- Within a few seconds the card disappears and the effects switch on.
If the browser cannot reach back to the plug-in (for example when you approve from another device), the activation page offers Get a code for the plug-in. Press ENTER CODE in MOSAIC, paste that code and press Return.
A licence covers two computers at a time. YOUR PRODUCTS on the card, or the Account menu on the website, opens the page where you manage them. Once activated, MOSAIC keeps a signed lease that lasts up to 72 hours, so you can work offline for up to three days at a stretch.
The window, at a glance
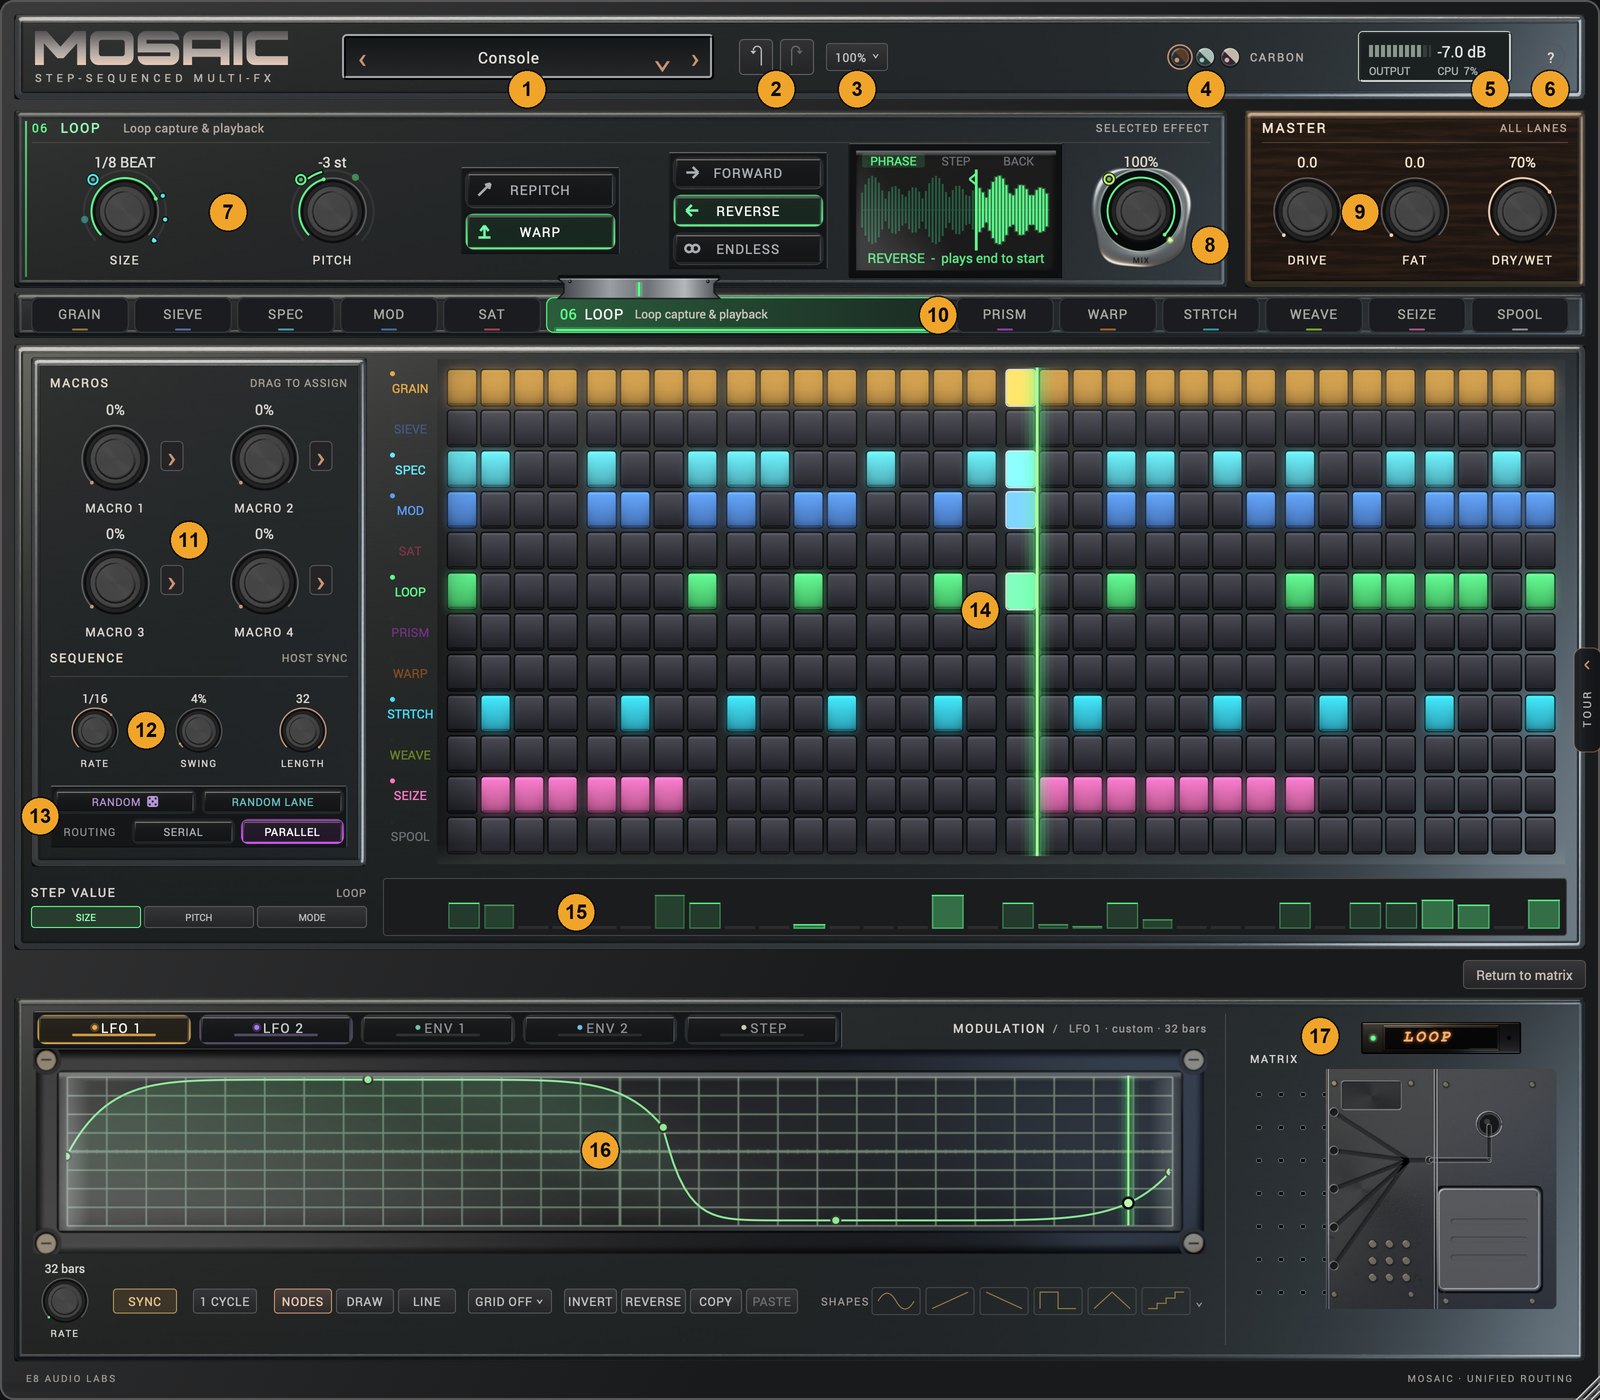
- Preset key. The arrows step through every factory and library preset. Click the name to open the browser.
- Undo and redo. Every gesture is one step: a paint sweep, a knob move, a deck edit, a matrix change.
- SIZE key. Scales the whole window to a step from 70% to 180%, or Fit to screen. New instances open at the size you pick.
- Skin selector. Three swatches pick the skin: Carbon, Mineral or Oxblood. The choice applies to every open MOSAIC.
- Output meter (left and right) with the CPU load.
- Help mode
?. Turn it on and a one-line description appears when the pointer rests on any control. It is off each time the window opens. - Selected effect. The lane’s number, name and role, then its controls, five of them at most; a few lanes replace a knob with a switch or a display.
- MIX for the selected lane. How much of the lane’s output replaces its input. At 0 the lane is bypassed exactly.
- Master section. DRY/WET is the global mix; DRIVE is a saturation stage on the whole output; FAT weights DRIVE toward the low end.
- Lane keys. Twelve keys on the rail under the effect panel, one per effect. The selected key widens to show the lane’s number, name and role, with a metal bridge up into the panel it drives; click another and the knob row, the STEP VALUE band and the deck all follow it.
- Macros M1 to M4. Four dials you can automate from your DAW. Drag a dial’s
>tab onto any effect knob to control that knob with the macro. - RATE, SWING, LENGTH. The size of one step, the shuffle, and how many steps loop.
- RANDOM writes a whole new scene, modulation matrix included; RANDOM LANE re-rolls only the selected effect and only its own routes. ROUTING: SERIAL / PARALLEL picks how the lanes are wired.
- The grid. Twelve rows of thirty-two cells. The lane switches down the left mute and unmute each row.
- STEP VALUE band. A value per step for one parameter of the selected lane.
- Mod deck. Five modulation slots per lane: two LFOs, two envelopes and a step sequence, with a shape editor and its draw tools.
- Nameplate and MATRIX pedal. The nameplate shows the selected lane. The pedal opens the global modulation matrix inside the window, over the sequencer and the deck; press it again to return.
Guided tour. The TOUR tab on the window’s right edge slides out a shade listing these seventeen regions. Pick one and MOSAIC dims the rest of the window, outlines that region, and says what it does and one thing to try; START TOUR, NEXT and BACK walk them in order. The shade moves to the left side when the region it points at is on the right, and everything stays playable while it is open. Press the tab or the × to close it.
The first time you open the window of a MOSAIC you have just inserted, it plays a short boot animation, over within about 3.6 seconds, before the pattern appears. Click anywhere or press any key to skip it. It plays once per plug-in instance: closing and reopening the window, or reopening a saved project, goes straight to the pattern. The standalone app plays it at every launch.
Five ideas
1. Lanes are effects

Each row of the grid is one effect. MOSAIC has twelve, and each has its own colour on the grid, its own key on the lane rail, its own knobs, its own MIX and its own modulation slots.
| Lane | What it does |
|---|---|
| GRAIN | Granular cloud: slices the input into tiny grains and rebuilds it as texture. Coupled to SIEVE. |
| SIEVE | Spectral gate: carves the sound in the frequency domain, letting only chosen energy through. Coupled to GRAIN. |
| SPEC | Spectral freeze: captures and holds the sound’s spectrum as a sustained, smearable pad. |
| MOD | Modulation: chorus, flanger and phaser movement, from subtle width to full warble. |
| SAT | Multipolar saturator: four distortion curves with asymmetry and tone, from tape warmth to wavefolding. |
| LOOP | Tempo-synced looper: captures beats or bars and replays them forward, reversed, or endlessly re-captured. |
| PRISM | Filter suite: ladder, modal-resonator and diffusion filters with drive and morph. |
| WARP | Transient designer: reshapes the punch and tail of every hit, and can smear onsets entirely. |
| STRTCH | Granular time-warp: slows, freezes, reverses or scrubs through the last captured bar. |
| WEAVE | Beat re-sequencer: cuts the bar on a musical grid and re-arranges it in groove-sized chunks — moved, echoed, stuttered, reversed or repitched. |
| SEIZE | Capture-repeat instrument: draw a curve over one cycle and GRAB seizes the tail into an exact repeat. |
| SPOOL | A failing tape transport: brake it to a pitch-diving stop, spin it backwards, and dial in how badly the deck breaks. |
GRAIN and SIEVE listen to each other. Their COUPLE knobs set how strongly: the cloud breathes with the gate, and the gate opens around the cloud’s transients.
2. Steps are time

The grid runs left to right in time with your DAW. Three dials on the rail set the clock:
- RATE is the size of one step: 1/4, 1/8, 1/16 or 1/32 note. At 1/16 the thirty-two steps are two bars.
- LENGTH is how many steps loop before the playhead returns to the start: 2, 4, 8, 16 or 32. The green bracket on the grid shows the loop.
- SWING delays every other step for a shuffle feel.
A single lane can loop a different length from the rest. Ctrl-click (or Shift-click) a lane switch to cycle it through 2, 4, 8, 16, 32 or back to following LENGTH. Two lanes of different lengths drift against each other and come back around: polymeter.
The sequencer only advances while your DAW’s transport is rolling. Stop the transport and the grid holds. The standalone app has no DAW, so it runs its own clock at 120 BPM.
3. Paint to play
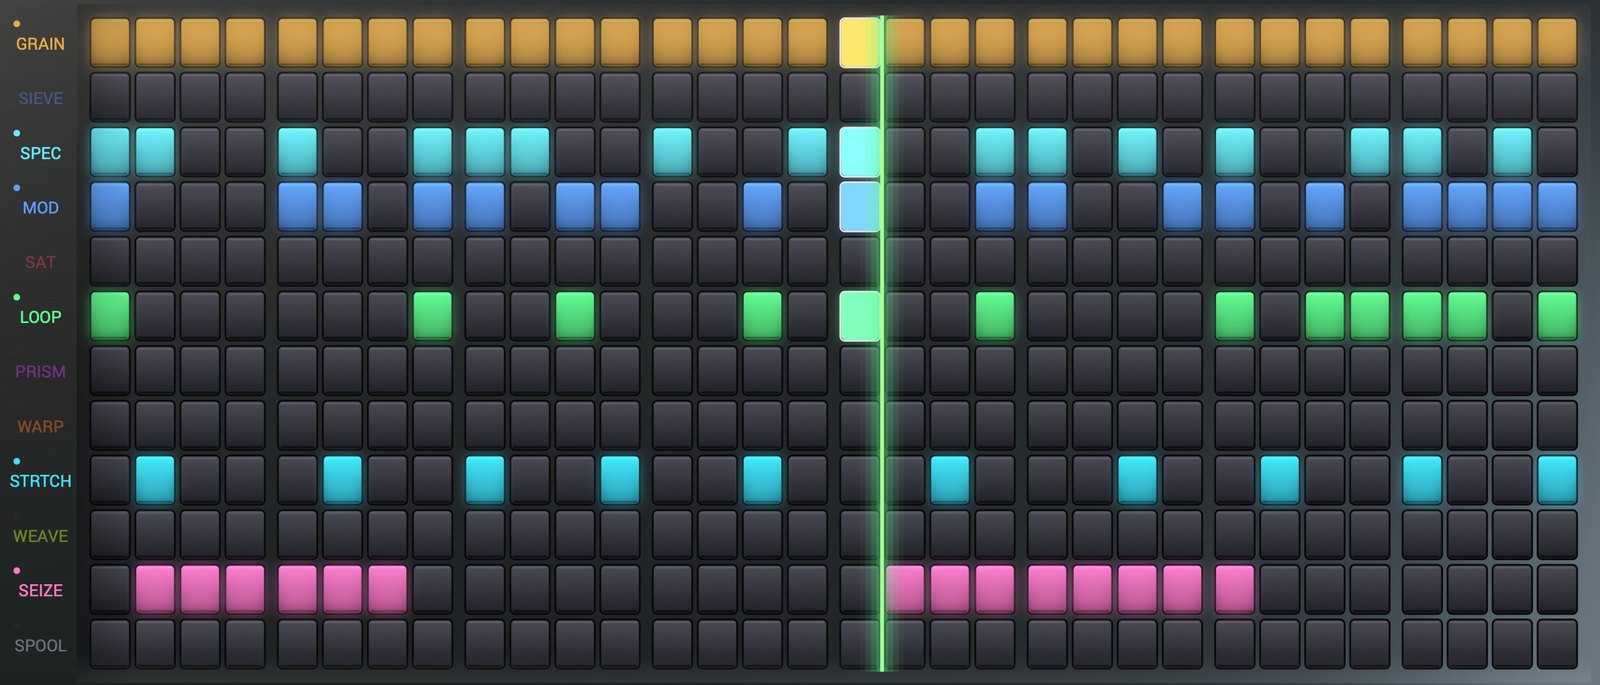
- Click a cell to turn it on or off. Drag to paint a run of cells in the same state.
- Painting on a muted lane wakes the lane.
- Shift+drag selects a rectangle of cells. Drag inside the selection to move it; hold Alt while dragging to copy it instead. Esc clears the selection, Delete clears its steps, and Cmd+D (Ctrl+D on Windows) duplicates the selection to the right.
- Cmd+Z and Cmd+Shift+Z (Ctrl on Windows) undo and redo, the same as the header buttons.
- Click a lane switch to mute or unmute the row. Right-click it to lock the lane, so the randomizer leaves it alone.
While a lane’s step is on, that lane processes the audio. While it is off, the lane is a wire. That is the whole trick: an effect that is only there for the steps you painted.
4. Knobs set the sound, modulation moves it

The knob row is where you set a lane’s sound. A lane’s knobs are the base value of each parameter, and your DAW can automate them.
Everything else adds movement on top of the knob:
- STEP VALUE gives a parameter a different value on each step. Pick the parameter from the chips at the left of the band and draw bars. A step without a bar just uses the knob. Right-click a bar to clear it.
- The mod deck gives each lane five modulation slots: LFO 1, LFO 2, ENV 1, ENV 2 and STEP. Click a slot to edit it, right-click it to turn it off, and drag it onto a knob to make that knob its target. An LFO picks from a bank of shapes and runs tempo-synced (32 bars down to 1/64) or free (0.05 to 20 Hz). An envelope is a standard attack-hold-decay-sustain-release, triggered by the lane’s steps. STEP is a 16-value sequence that can follow the grid or run on its own clock.
- The matrix is global. Press the pedal at the bottom right and the routing matrix opens inside the window, over the sequencer and the deck: sources and macros on the left, every route grouped by destination lane on the right. The bank keeps its own pool of sources (LFOs, envelope followers, attack/release envelopes, ramps, step sequences, macros). A route sends one source to any parameter of any lane with its own depth, and can be gated so it only acts while a chosen lane’s step is on.
- Macros are four dials your DAW can automate. Drag a macro’s
>tab onto an effect knob and the route is made for you through the matrix.
A modulated knob wears a ring that shows the range the modulation sweeps. Hover it and a pane lists every source on that knob with its range; drag a source there for depth, double-click it to zero it, or press CLEAR.
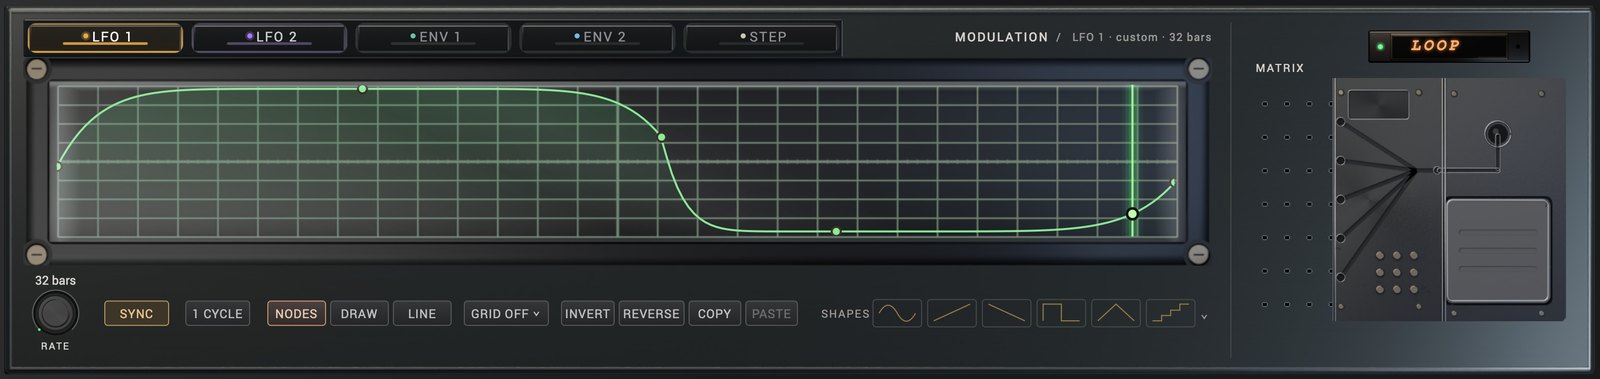
Under the LFO and STEP plots sits the draw-tool strip: NODES, DRAW and LINE write the shape, GRID snaps it to time divisions and value levels, and INVERT, REVERSE, COPY and PASTE work on the whole shape. An envelope is edited on its own plot: drag its corners, or drag open plot to bend it. The glossary describes every tool, and the tutorials put them to work.
5. Presets are banks of patterns

A preset is a bank of twelve patterns. Each pattern is a whole scene: which lanes are on, every lane’s thirty-two steps, its per-step values, its five deck slots, its loop length and its knob settings, RATE, SWING, LENGTH and the macros included. Switching patterns is the way to move from a verse to a drop without touching a knob. The matrix and the master section (DRY/WET, DRIVE, FAT) are shared by all twelve.
Click the preset name to open the browser, a catalogue sorted by type. The column on the left lists the types, each with its count: All, Patterns (the twelve patterns of the current bank; click one to switch to it), Factory (eight banks built into the plug-in) and one type per library folder: Ambient, Granular, Loops, Motion, Rhythmic, Spectral and Swirl, 144 presets in all. Type in the search field to filter the list by name or type. Click a name to load it and keep browsing; the up and down keys audition the next one; Esc closes.
The three pills at the top are NEW (empty the bank and start from nothing), IMPORT (load a .mosaic file from anywhere) and EXPORT (write the bank to a .mosaic file wherever you choose). To keep a preset in the library, type a name in the field at the bottom and press SAVE PRESET: it goes into the User folder of Documents/MOSAIC/Presets and appears under the User type at once. SHOW FOLDER opens that folder. A save never replaces a different preset of the same name; it asks for another name instead. Presets are plain files, easy to back up and share.
Your DAW project saves the complete state of MOSAIC on its own. You never need a preset file to recall a song.
Your first pattern
Put MOSAIC on a drum loop, press play in your DAW, and try this.
- Pick a lane. Click the LOOP key on the lane rail. The knob row changes to SIZE, PITCH, the REPITCH / WARP switch, FORWARD / REVERSE / ENDLESS, a live view of the loop with its TRIG keys, and MIX.
- Paint a beat-repeat. Set SIZE to 1 BEAT. In the LOOP row, click step 13 and drag to step 16. For the last beat of every bar, LOOP now replays the first beat of the bar, which it captured as the bar began. Click BACK on the loop view and it repeats the beat just before instead. Set RATE to 1/16 and LENGTH to 16 if they are not already, so one pass of the loop is one bar.
- Add grit on the downbeats. Click the SAT key and paint steps 1, 5 and 9 in the SAT row. Turn DRIVE up until the hits bite. The small scope in the header, between the SIZE key and the skin selector, draws the saturation curve as you do.
- Balance it. Each lane has its own MIX. Back it off for a subtler blend, or leave it full and use the master DRY/WET to bring the dry signal back.
- Make it move. With SAT selected, drag the LFO 1 pad from the deck onto the DRIVE knob. Pick a shape from the bank and set RATE to 1 bar. DRIVE now sweeps once per bar, and the ring on the knob shows how far.
- Let the machine try. Press RANDOM for a coordinated scene — patterns, knobs and the modulation matrix rolled together — or RANDOM LANE to re-roll only the selected effect. Undo if you prefer what you had. Lock a lane (right-click its switch) to keep it, and the routes pointing into it, out of the roll.
- Save it. Click the preset name, type a name in the field at the bottom of the browser, and press SAVE PRESET.
From here, try SERIAL against PARALLEL on the rail. In SERIAL the lanes run one after another in a fixed order; in PARALLEL they all work on the same input and their outputs are summed.

Good to know
- The window is resizable. Drag the corner grip. It scales from 70% to 180% of its default size.
- Help mode is the fastest way to learn a control: press
?and hover. - The header pane changes with the lane. Between the SIZE key and the skin selector, SAT shows its curve, SIEVE shows a spectrum you can drag to sweep its cursor, SPOOL shows the reel, and SEIZE shows a thumbnail of its curve that opens the full-width BENCH editor. The other lanes leave it empty.
- Latency is reported to your DAW and changes with the lanes you use. The spectral lanes (SIEVE, SPEC) need lookahead; most lanes need none. Your DAW compensates automatically.
- Everything rings out. When the transport stops, MOSAIC breathes out over eight seconds instead of cutting off.
Where next
- Tutorials: seven hands-on recipes, from a LOOP stutter to a twelve-pattern performance bank.
- Technical guide: how MOSAIC is organised: the signal path, the timing model, each lane, the modulation layers, presets and files, and host integration.
- Glossary of functions: every control in the window, what it does and how it sounds.
- Support: support@e8audiolabs.com. For a bug, include your DAW and version, your OS, sample rate and buffer size, the plug-in format, and what you did just before. A project that reproduces it is the most useful thing you can send.