MOSAIC tutorials
Seven short recipes, built on the controls in the window and on presets from the factory library. They assume you have read Getting started and know where the grid, the knob row and the mod deck are. Every control named here is described in the glossary.
For all of them, put MOSAIC on a track that already has sound (a drum loop is the easiest place to start) and press play in your DAW: the sequencer only advances while the transport rolls. The standalone app runs its own clock at 120 BPM.
Most recipes start from an empty bank. To get one, click the preset name in the header, press NEW at the top of the browser, then press Esc. NEW clears every cell, per-step value, deck slot and matrix route, but each pattern keeps its own knob settings, so the first step of each recipe sets the ones that matter.
Make a beat stutter with LOOP
What you’ll learn: how a painted run turns LOOP on, how SIZE sets the length of the repeat, and how MODE and PITCH change what it replays.

- Start from an empty bank. On the rail, set RATE to 1/16 and LENGTH to 16, so one pass of the grid is one bar.
- Click the LOOP key. Turn SIZE until it reads 1 BEAT.
- In the LOOP row of the grid, click step 13 and drag to step 16. For the last beat of every bar, LOOP replays the first beat of the bar, which it captured as the pass began (TRIG is on PHRASE, the keys along the top of the loop view).
- Now make it a stutter. Turn SIZE down to 1/8 BEAT. The same four steps now repeat a much smaller slice, over and over.
- Click REVERSE. The capture plays backwards; the loop view’s caption changes to “plays end to start”, and its playhead shows where the looper is reading.
- Set PITCH to −12 st. With REPITCH lit, the repeat is tape varispeed: it drops an octave and slows down with it. Click WARP and the repeat keeps its original speed and shifts pitch only.
- Back MIX off if you want some of the dry beat under the repeat. At 0 the lane is bypassed exactly.
What you should hear: the bar plays untouched for its first three beats; on the fourth, LOOP takes over and replays a short capture, forwards or backwards, at the pitch you set. On every other step the lane is a wire.
Try next:
- Click BACK on the loop view: the run now repeats the beat that played just before it, the classic beat repeat. STEP plays the run’s first SIZE live and then repeats it, so at 1/8 BEAT the fourth beat stutters on its own first eighth.
- Click ENDLESS: instead of holding one capture, LOOP keeps re-capturing live.
- Shift-drag across steps 13 to 16 to select them, then drag the selection to steps 5 to 8 to move the stutter earlier in the bar.
- In the Loops type of the preset browser, load Stutter Bay (eighth-beat loops, half-bar SEIZE stutters and a worn deck), Reverse Tape (captured bars played backwards) or Octave Down (loops and a pitched SEIZE stutter an octave down).
Open a filter on the off-beats with PRISM
What you’ll learn: how the STEP VALUE band gives one parameter a different value on each step, so a filter can sit closed on the beat and open on the off-beats.

- Start from an empty bank, with RATE at 1/16 and LENGTH at 16. At 1/16 the beats fall on steps 1, 5, 9 and 13, and the off-beats between them on steps 3, 7, 11 and 15.
- Click the PRISM key and click LADDER. Turn CUTOFF well down, so the sound is dark, and raise RESO a little.
- Paint every step of the PRISM row, 1 to 16. PRISM now filters the whole bar at the knob’s cutoff.
- In the STEP VALUE band, click the CUTOFF chip. While the pointer is over the band, a dashed line marks the knob’s own value.
- Draw a tall bar, well above the dashed line, on steps 3, 7, 11 and 15. Steps without a bar keep using the knob.
- Click the RESO chip and draw bars on the same four steps for more ring on the open hits. Right-click a bar to clear it.
- Turn up DRIVE for grit. In LADDER mode it sets how hard the filter saturates.
What you should hear: a closed, dark filter on the beats that opens on every off-beat, with more resonance where you drew it.
Try next:
- Click MODAL for ringing resonators, or DIFFUSE for a dispersive prism that smears each hit into a chirp around the cutoff (MORPH lengthens it; in DIFFUSE, DRIVE is greyed out and does nothing).
- Draw MORPH bars too: MORPH moves the filter’s character within the chosen mode.
- Paint the off-beats on SIEVE instead and drag the spectrum in the header, between the SIZE key and the skin selector, to sweep its cursor (POS) and choose which partials survive.
- Load Clave Drift or Syncopath from the Rhythmic type: ladder-filter hits on a drifting clave, and squelching ladder accents on the syncopations.
Add a granular effect for half a bar
What you’ll learn: how GRAIN turns a run of steps into a cloud, and how an envelope on the deck makes that cloud swell each time the run starts.
- Start from an empty bank, with RATE at 1/16 and LENGTH at 16.
- Click the GRAIN key. In the GRAIN row, click step 9 and drag to step 16: the second half of every bar.
- Set the cloud: SIZE up towards 150 ms (long grains are smeared and washy), SPRAY up (scattered and diffuse), PITCH to +12 st for an octave shimmer, and DENS right down to 1 (sparse specks).
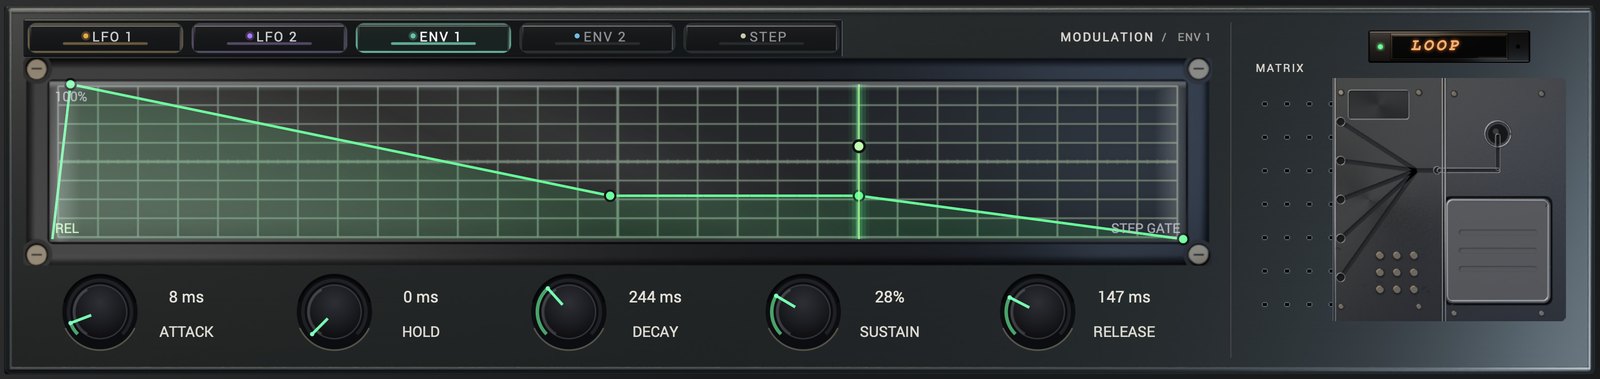
- In the deck, click ENV 1; clicking a slot switches it on. Drag the ENV 1 key onto the DENS knob. On the card that appears, drag the bar until the ring on DENS reaches the top of its range. (Esc or a right-click on the card undoes the drop.)
- Lengthen the swell. On the envelope plot, drag the first corner, the attack peak, to the right; the ATTACK readout follows. Try a few hundred milliseconds.
- Drag the end of the decay down to lower SUSTAIN, or drag open plot up or down to bend the whole envelope. Double-click open plot to straighten it again.
What you should hear: at the start of each run the input dissolves into sparse, octave-up specks that thicken into a cloud as the envelope rises, then settle to the SUSTAIN level while the steps stay on. When the run ends at the bar line, GRAIN is a wire again and the dry sound returns.
Try next:
- Drag ENV 1 onto SIZE as well: one slot can move several knobs.
- Option-drag (Alt on Windows) the attack peak to add a HOLD at the top of the swell.
- Load Snowlight (Ambient: octave-up grain sparkle over a bright freeze), Pollen (Granular: bright grains on a Euclidean grid, the sieve deciding which partials bloom) or Particle Choir (Granular: grains voiced in fifths and octaves).
Shape a lane with an LFO and draw mode
What you’ll learn: how to point a deck LFO at a knob, and how to draw its shape with the NODES, DRAW and LINE tools, a snap grid, and copy and paste.
- Start from an empty bank, with RATE at 1/16 and LENGTH at 16. Click the PRISM key, click LADDER, turn CUTOFF down and paint all sixteen steps of the PRISM row.
- In the deck, click LFO 1, then drag the LFO 1 key onto the CUTOFF knob. Set the depth with the bar on the card, or later by dragging the knob’s ring.
- Make sure the chip beside the RATE dial reads SYNC, then drag the dial to 1 bar. The 1 CYCLE key beside it tells you the plot spans one cycle of the LFO.
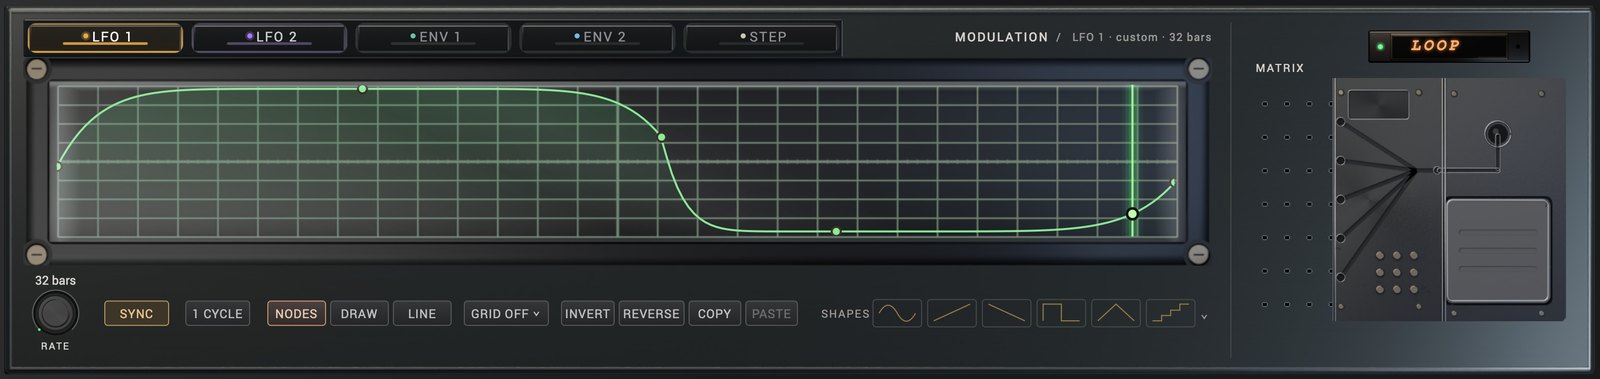
- Click DRAW. Open the GRID menu and choose 1/16 under TIME, then open it again and choose 8 levels under VALUE. The key now reads
1/16 · 8. - Draw a rising line across the plot from bottom left to top right. With a TIME grid, the stroke becomes one held value per division: a staircase of sixteen steps, each snapped to the value grid.
- Click REVERSE to make the staircase fall instead, or INVERT to flip it upside down. Each is one undo step.
- Click LINE and drag a straight run across part of the plot; it replaces what lay between the press and the release. Then click NODES: drag a node to move it, drag a segment to bend it, double-click to add or remove a node, right-click a segment to change its shape.
- Click COPY, click LFO 2, and click PASTE: LFO 2 now has the same shape. Drag the LFO 2 key onto RESO and set its RATE to 2 bars, so the two move at different speeds.
What you should hear: CUTOFF stepping through the drawn staircase once per bar, and RESO following the same shape at half the speed. A modulated knob keeps its position and wears a ring showing the range the modulation sweeps.
Try next:
- Pick a ready shape instead: the six SHAPES keys load Soft Sine, Ramp Up, Saw Down, Square, Triangle and Stairs, and the chevron at the end of the row lists all 40.
- Click STEP and PASTE: a curve becomes 16 steps. With LINE, drag a ramp across the bars.
- Set GRID back to Off under both TIME and VALUE and draw freehand: the stroke becomes up to 32 editable nodes.
- Load Servo (Motion: stepped filter servo moves) or Auto Pilot (Motion: a self-driving filter sweep).
Route a modulator in the matrix
What you’ll learn: how to add a bank source in the routing matrix, send it to a knob, set its depth and gate it so it only acts on another lane’s steps.
- Start from an empty bank, with RATE at 1/16 and LENGTH at 16. On PRISM, click LADDER, turn CUTOFF down and paint all sixteen steps. On GRAIN, paint steps 9 to 16. Then click the PRISM key again so its knobs are on the knob row.
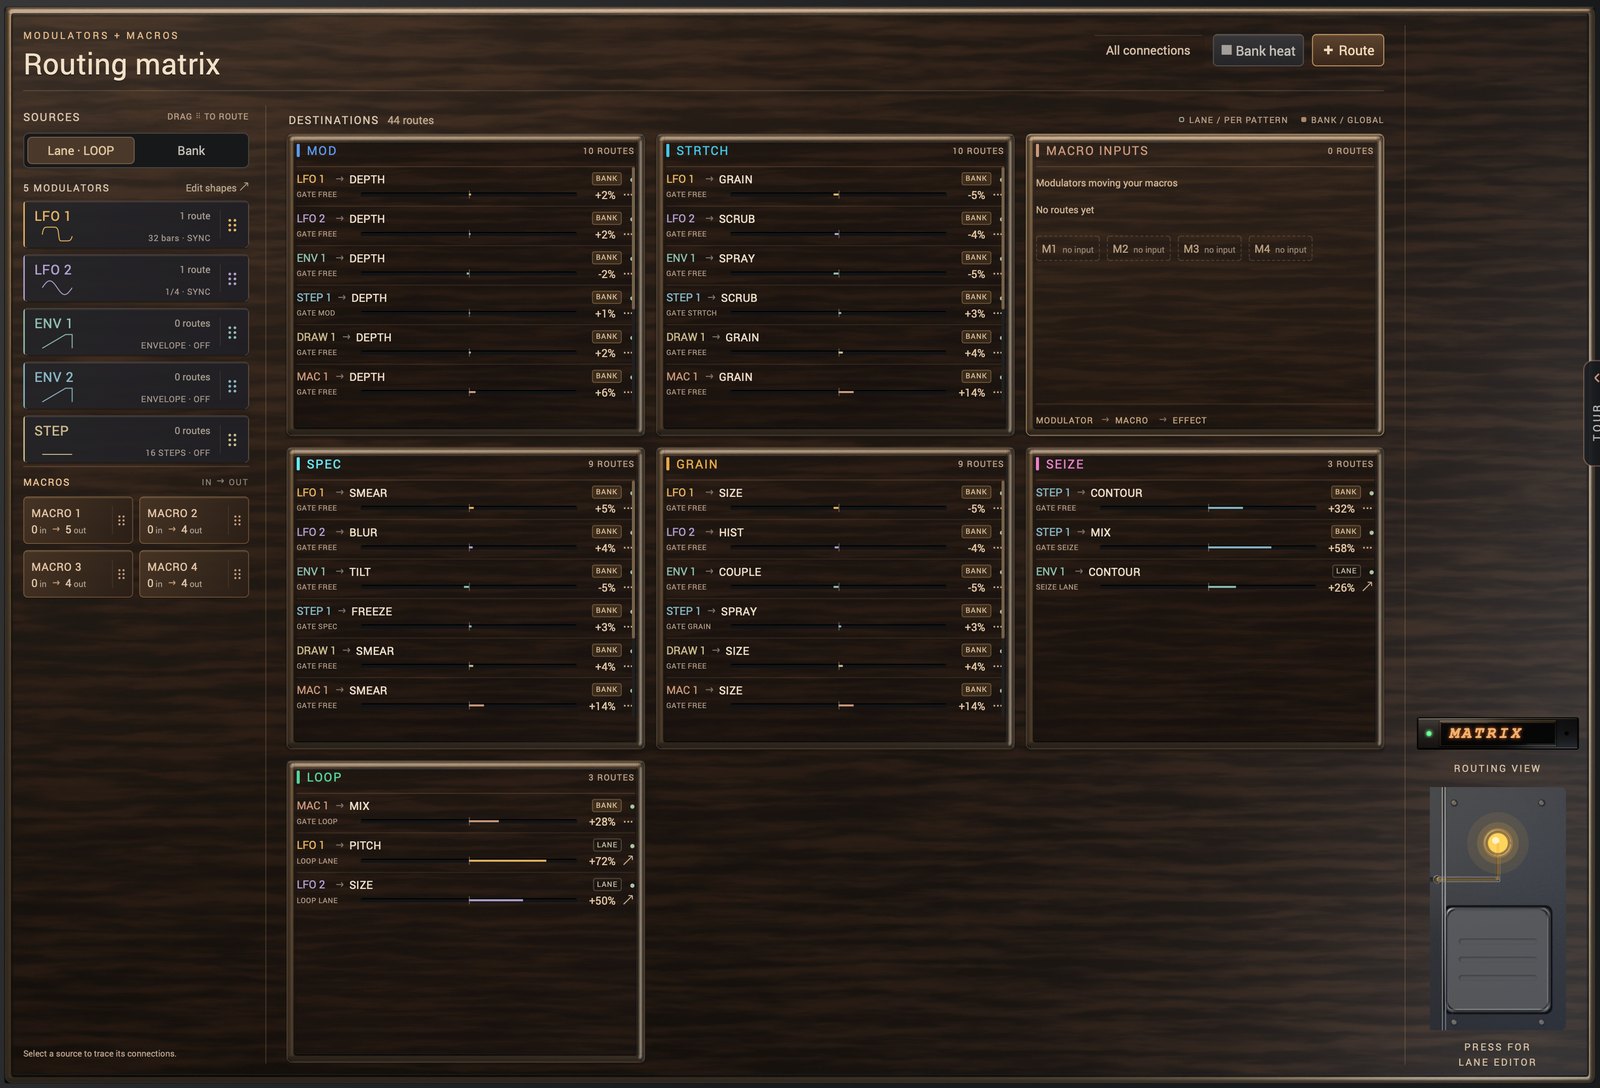
- Press the MATRIX pedal at the bottom right. The routing matrix opens inside the window, over the sequencer and the deck; the knob row stays where it is.
- Under SOURCES, click Bank, then click the + Source tile and choose LFO. The bank now has an LFO 1 of its own, separate from the deck’s.
- Drag the new LFO 1 tile onto the CUTOFF knob. The route LFO 1 → CUTOFF appears on the PRISM card under DESTINATIONS, marked BANK and GATE FREE.
- Drag the route’s depth bar to the right for a positive amount; the signed percentage follows. Double-click the bar to zero it.
- Click GATE FREE and choose Gate by GRAIN. The route now acts only while GRAIN’s step is on.
- Click Edit bank to open the bank editor, click LFO 1’s rate chip and choose 1 bar. A new LFO is bipolar (its badge reads
±), so it swings both ways around the knob; click the badge to make it move only upward. - Click HEAT for the heat grid: one row per source, one column per lane, each cell the summed depth of the routes between them. Click MAP to return to the routing map, and press the pedal again to return to the deck.
What you should hear: for the first half of each bar PRISM sits at its knob; for the second half, while GRAIN’s steps are on, the cutoff sweeps with the LFO.
Try next:
- + Route adds a bank route and asks for its destination straight away; the matrix can reach any parameter of any lane, including those with no knob on the row.
- Click a source or macro on the left to trace its connections; All connections shows everything again.
- Load Kinetic (Motion: grains against a trance-gated SEIZE, filter and punch following the macros) and look at how its routes are spread across the cards.
Build a twelve-pattern performance bank
What you’ll learn: how the twelve patterns of a bank work as scenes, how to switch between them, and how to save the bank as your own preset.

- Start from an empty bank. Build a first scene: for example the LOOP stutter from the first recipe, plus a few SAT hits on steps 1, 5 and 9.
- Click the preset name and choose Patterns in the column on the left. The twelve rows read Pattern 1 to Pattern 12, and a dot marks the one that is playing.
- Click Pattern 2. MOSAIC keeps everything you did in pattern 1 and switches to pattern 2. The browser stays open, so you can keep switching; press Esc when you want the window back.
- Build pattern 2. Each pattern keeps its own cells, per-step values, deck slots, loop lengths, knob settings (RATE, SWING and LENGTH included) and SERIAL / PARALLEL setting, so check RATE and LENGTH here too.
- For quick variations, lock the lanes you want to keep (right-click their lane switches) and press RANDOM, or select one lane and press RANDOM LANE. RANDOM also rebuilds the matrix, which all twelve patterns share; routes into locked lanes are kept. Undo if you prefer what you had.
- Try a polymeter: Ctrl-click (or Shift-click) a lane switch until the number under its name reads 8. That lane now loops eight steps while the rest follow LENGTH.
- Fill as many of the twelve as you need, then save the bank: in the browser, type a name in the field at the bottom and press SAVE PRESET. It appears under the User type at once.
What you should hear: each click on a pattern row moves the whole effect scene at once, like changing sections of a song. The master DRY/WET, DRIVE and FAT stay where they are.
Try next:
- Every library preset is built as a set of twelve: Signature (the bank’s figure), Answer (call and response), Undertow (half-time and darker, on a two-bar loop), Air (the lead rests), Lift (a build into the loop point), Turn (the lead displaced on its own loop length), Space (held supports), Suspended (the special voice’s longest window), Bloom (the fullest texture), Return (the figure, mutated), Peak (a double-time grid in the percussive categories) and Resolve (thinned and cooler). Load any of them and click through the Patterns rows in order.
- A pattern switch is one undo step: Cmd+Z (Ctrl+Z on Windows) takes you back.
- Your DAW project saves all twelve patterns and the matrix with the session; the preset is for reuse and sharing.
Perform with the four macros
What you’ll learn: what the four macros do in the factory presets, how to see where a macro goes, and how to give a macro new targets.
- Click the preset name, choose the Motion type (or type “hands” in the search field) and click Hands On. Press Esc.
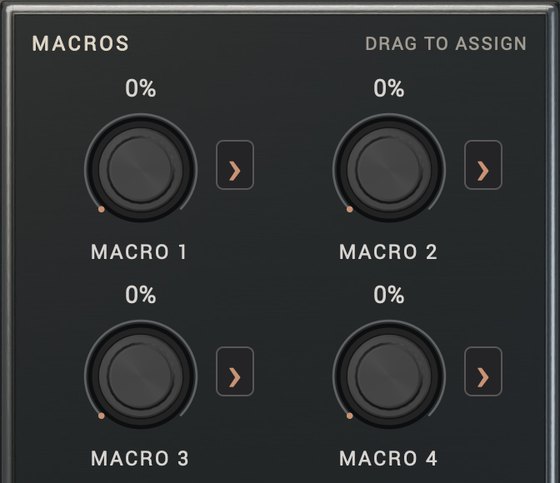
- Find the four dials under MACROS on the rail. In every preset of the library (the seven category types) the macros have the same jobs: MACRO 1 is Texture, MACRO 2 Motion, MACRO 3 Colour and MACRO 4 Intensity. They rest at 0%, where they do nothing.
- Turn MACRO 1 up. In Hands On it lengthens and scatters the grains (GRAIN’s SIZE and SPRAY) and wears the transport (SPOOL’s WEAR).
- Turn MACRO 2 up for more WEAVE stutter and shuffle (STUTTER and ALGO) and a cloud that lags further behind the source (GRAIN’s HIST).
- Turn MACRO 4 up for more of the effects themselves (WEAVE’s and GRAIN’s MIX) and more PRISM resonance and drive.
- To see every target, press the MATRIX pedal and click the MACRO 3 tile under MACROS: only its routes stay lit. Click All connections to see everything again, then press the pedal to return.
- Give a macro a new target: drag MACRO 3’s
>tab onto any effect knob. The drop makes the route through the matrix; drag the knob’s ring or the bar on the card for depth.
What you should hear: the same patterns pushed in four directions. Texture, Motion, Colour and Intensity each reach two to four destinations across the effects the preset uses, and you hear a target only on the steps where its lane plays.
Try next:
- Automate the macros from your DAW: they are the host parameters Macro 1 to Macro 4.
- Each pattern keeps its own macro positions. In a freshly loaded preset every pattern starts at zero, so set the dials per pattern for a performance that changes shape as you switch.
- Drop a deck LFO, ENV or STEP key onto a macro dial to modulate the macro itself.
- Compare the macros of Stutter Bay (Loops), Tabla Ghost (Rhythmic) and Pollen (Granular): the same four jobs, aimed at different effects.