Getting started with COLLAGE
COLLAGE is a live glitch-processing instrument. Audio runs forward through a rack of five processors you can reorder, while an always-on control plane moves their controls. There is nothing to record and nothing to arm: insert it, load a preset or turn one knob, and the sound changes straight away.
What COLLAGE does

The signal corridor is the whole idea. Your audio enters, passes an input trim, runs through the five stations in whatever order you put them, then meets a master dry/wet blend, two output filters, an output trim and a soft ceiling. It never loops back.
| Station | What it does to the stream |
|---|---|
| SPECTRAL | Takes the spectrum apart into regions and moves the pieces: shift, scatter, diverge, hold. |
| GRANULAR | Rebuilds the stream out of independently placed grains read from the last four seconds. |
| MANGLE | Bends the waveform through a two-sided transfer curve: two algorithms, one above and one below a movable split. |
| TIME | Reads the stream back at its own rate and position: stretch, freeze, scrub, slice, repeat. |
| PLEAT | Folds the signal against itself, pleat by pleat: the smoother, warmer relative of MANGLE. |
Every station has a power latch, its own WET amount and its own output LEVEL, and every station keeps running while it is off, so switching one on never starts from cold.
The second idea is the control plane. Four followers listen to your input, two LFOs and two envelope followers generate motion, a dozen analysis lanes measure what each station is doing, four macros gather many controls under one knob, and a morph pad and a drawn vector path blend whole scenes. Any of them can be routed to almost any control. None of them is audio: the control plane observes the sound and moves the knobs, and that is all it does.
What you need
| macOS | Windows | |
|---|---|---|
| System | macOS 11 or newer, Apple Silicon or Intel (universal) | Windows 10 or 11, 64-bit (x64) |
| Formats | Audio Unit, VST3, standalone application | VST3, standalone application |
| Host | Any DAW that loads one of those formats. COLLAGE is an audio effect, listed under E8 Audio Labs, and takes no MIDI. | The same. There is no Audio Unit on Windows. |
COLLAGE is activated with an E8 Audio Labs account that holds a COLLAGE licence (see Activate). Until it is activated it passes audio through unprocessed, so nothing in a project is at risk.
Install
macOS
- Quit your DAW.
- Open
COLLAGE-0.1.0.pkgand follow the installer. The package is signed and notarised, and it installs for every user of the Mac:COLLAGE.componentin/Library/Audio/Plug-Ins/Components,COLLAGE.vst3in/Library/Audio/Plug-Ins/VST3, andCOLLAGE.appin/Applications. - The 336 factory presets are copied into
~/Documents/COLLAGE Presets/Factory. The copy is additive: presets you have saved there are kept. - Start your DAW again. If COLLAGE does not appear, rescan your plug-ins. It is listed under E8 Audio Labs.
The installer replaces any COLLAGE already on the machine, including earlier builds that carried higher version numbers, so there is nothing to uninstall first.
A manual ZIP, COLLAGE-0.1.0-bundles.zip, holds the same signed and notarised bundles and the factory presets: copy each bundle to its folder above, and merge the Factory folder into ~/Documents/COLLAGE Presets/Factory without deleting your own presets.
Windows
- Close your DAW.
- Run
COLLAGE-0.1.0-Windows-x64.exe; it needs administrator rights. The installer is not yet publisher-signed, so Windows may show an unknown-publisher warning; compare the file’s SHA-256 with the published checksum before you continue, and do not switch off system security policies to install it. - The installer places
COLLAGE.vst3inC:\Program Files\Common Files\VST3and the standalone application underC:\Program Files\E8 Audio Labs\COLLAGE. The 336 factory presets are added toDocuments\COLLAGE Presets\Factorythe first time COLLAGE opens, alongside any presets of your own. - Start your DAW again and rescan if needed.
A manual ZIP, COLLAGE-0.1.0-Windows-x64.zip, is also available: copy the whole COLLAGE.vst3 folder into the VST3 path above, keeping the bundle intact, and run the standalone from a folder you own.
Activate
The first time you open COLLAGE it shows an Activation required card over its window, with COLLAGE · your computer’s name beneath the headline and the line “Your project and settings are safe. Audio passes through unprocessed.” While the card is up the panel underneath does not respond; your DAW, its transport and its other plug-ins keep running.
- Press ACTIVATE. The card changes to Waiting for approval and shows an eight-character code in the form
XXXX-XXXX, with the line “Confirm this code at e8audiolabs.com/activate”. Your browser opens that page with the code filled in. If no browser appeared, press OPEN BROWSER AGAIN (the same key, renamed while the code is live), or opene8audiolabs.com/activate?code=XXXX-XXXXon any device, with your code in place of the Xs. - Sign in if the page asks you to, check that the code and the computer name match what COLLAGE shows, and press Confirm activation.
- A few seconds later the card disappears and COLLAGE processes audio.
The activation page also offers Get a code for the plug-in. If you use it, press ENTER CODE on the card, paste the code into the field (“Paste activation code, then press Return”) and press Return. That code works once, for this computer, and only for ten minutes; asking for another replaces it. The code on the card also lasts ten minutes: if it runs out before you confirm, press ACTIVATE again.
A licence covers two computers at a time, and a MOSAIC licence does not activate COLLAGE. YOUR PRODUCTS on the card opens e8audiolabs.com/your-products, where the Computers list shows which computers use your licence and Deactivate frees a place. Once activated, COLLAGE keeps a signed licence on the computer that renews about once a day and lasts up to 72 hours, so you can work offline for up to three days at a stretch.
First insert
Put COLLAGE on a track with some audio on it. Three things to notice in the head band:
- The preset field reads INIT. A fresh instance is a real patch, not an empty one.
- LATENCY reads 819 samples, about 17 ms at 48 kHz. Your host compensates for it automatically. It does not change when you bypass, reorder or modulate anything.
- ROUTES reads 15. INIT already carries fifteen modulation routes, which is why it moves.
The MORPH panel is open on the right of the corridor, because a fresh instance opens it: INIT stores all four scenes and a four-point vector, so the pad has something to show. The MORPH latch above the corridor closes it, and a session you save with it closed reopens closed.
The window
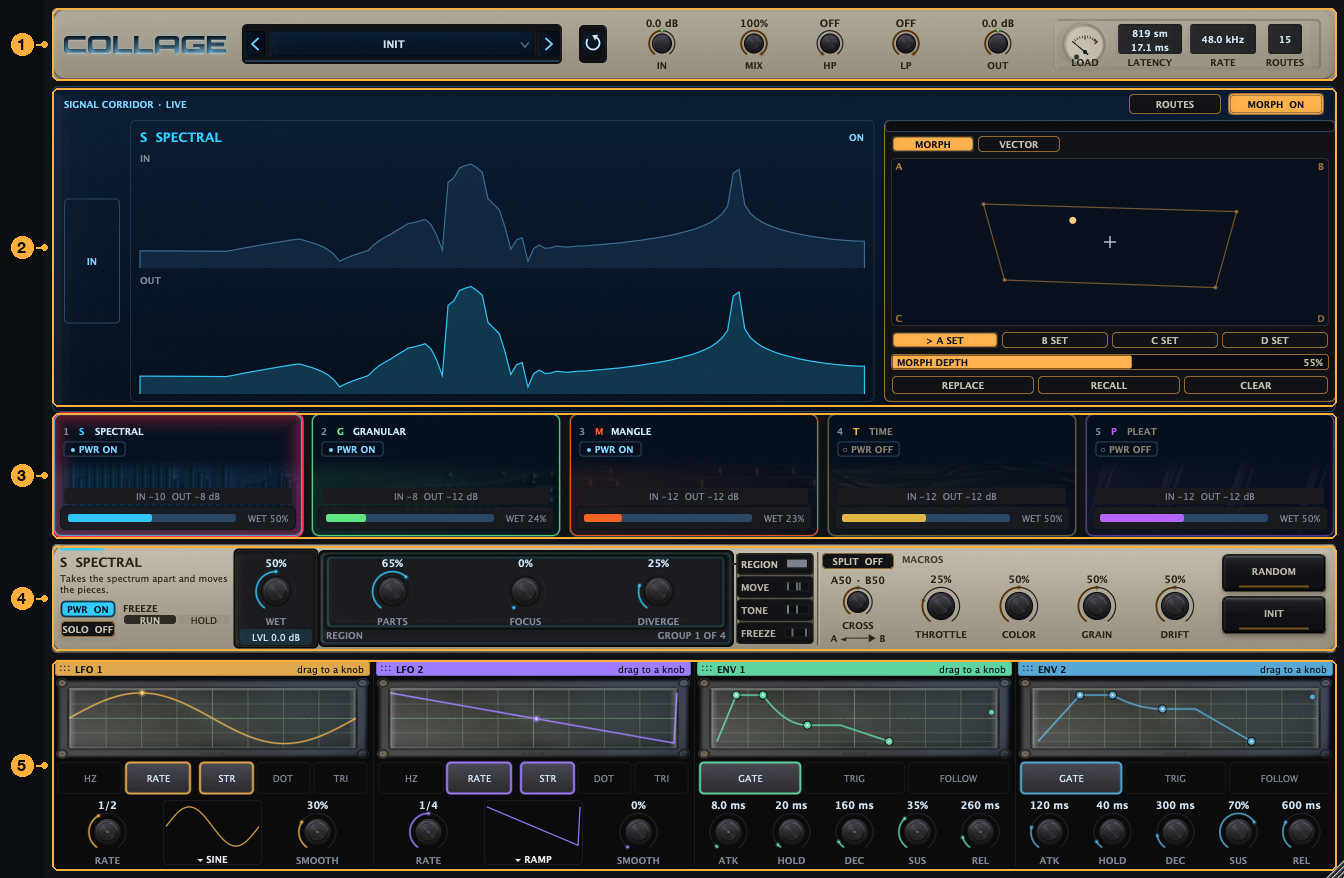
- Head band. The preset console, undo, and the master path in signal order: IN, MIX, HP, LP, OUT. On the right, the engine’s load, the reported latency, the sample rate and the route count.
- Signal corridor. The stream, drawn from IN to OUT. The large pane shows what the focused station is doing to it, from live measurements; the rows beside it show what the other four are doing. The ROUTES and MORPH latches open their panels over this area.
- Station cards. The five stations in rack order. Click a card to focus it, press PWR to power it, drag it to reorder the rack. Each card reads its measured input and output level, and highlights an output peak above unity, so you can see where gain builds up.
- Control apron. The focused station’s controls: its power and solo, its WET with the LVL output level beneath it, a well with the seated group of knobs, the group ladder that chooses which group is seated, the SPLIT and CROSS column, the four macros, and the RANDOM and INIT keys.
- MOD band. LFO 1, LFO 2, ENV 1 and ENV 2, always visible. Each has a drag chip: drag it onto a knob to route it there.
Guided tour. The TOUR tab on the window’s right edge slides out a shade that walks these regions one stop at a time: pick a stop and COLLAGE dims the rest of the window, outlines that region, and says what it does and one thing to try. START TOUR, NEXT and BACK walk them in order; press the tab or the × to close it. Everything stays playable while it is open.
The window opens at 1300 × 878, resizes freely from 1120 × 700 up to 2600 × 1756, and remembers its size.
Ten minutes with COLLAGE
1 · Listen to INIT
Play your track. INIT runs GRANULAR and MANGLE at a modest wet amount with SPECTRAL, TIME and PLEAT off. Turn MIX in the head band down to hear how much of the sound is COLLAGE and how much is your input, then set it back to 100 %.
2 · Play the macros
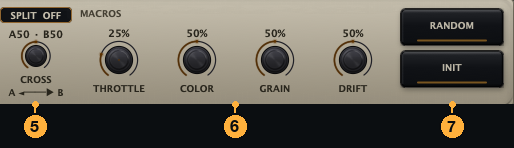
The four amber knobs are the fastest way into any preset. In INIT, THROTTLE pushes grain density and MANGLE’s drive, COLOR moves MANGLE’s shape and the grain tilt, GRAIN changes grain size and spray, and DRIFT moves the read position and pitch. Every factory preset routes all four to something audible, so the same four gestures work everywhere.
3 · Step through the presets
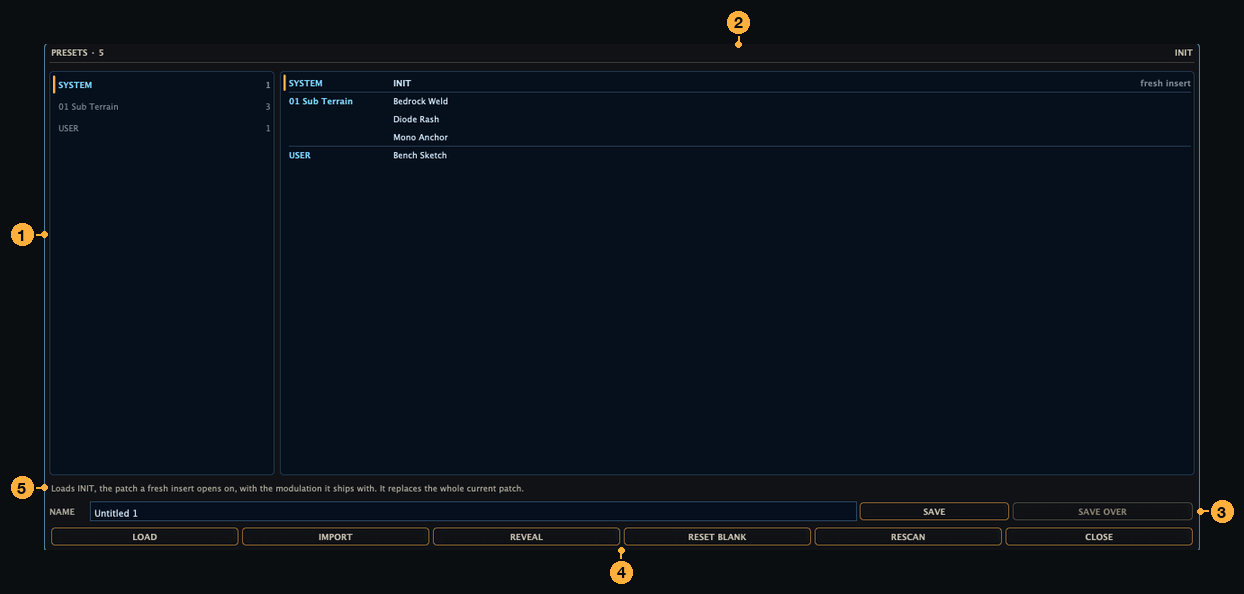
The chevrons beside the preset name step through the presets on disk. Press the name itself to open the LIBRARY: the banks on the left, the presets on the right, and a status line that tells you what the selected row will do. Select a preset and press LOAD. The factory content is 336 presets: INIT and sixteen themed banks; each bank’s name tells you what it is for.
4 · Power and reorder the stations

Click a card to focus that station in the apron; the focused card is marked by a red fade inside its outline, even while its power is off. Press PWR to bring it into the stream; the change is a 10 ms fade, so it never clicks. Drag a card left or right to change the order: a red marker shows where it will land, and the audio crosses the seam without a hole. Try moving MANGLE before GRANULAR and listen to what the grains are made of.
SOLO in the apron auditions the focused station alone. It is an audition override, never saved.
5 · Turn the knobs

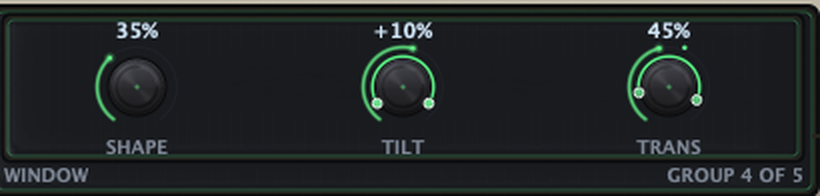
The well holds the seated group’s knobs, two or three at a time. The keys to the right of it are the group ladder: press REGION, MOVE, TONE or FREEZE on SPECTRAL and the well changes. The first group of every station is its performance group, the one a cold instance seats.
Drag a knob up or down to change it; hold Shift for fine changes; double-click to restore the default. The value reads above the knob in the control’s own units.
The LVL strip under WET is the station’s output level, from −24 to +12 dB. It turns the processed sound up or down before WET blends it with the dry, without driving the effect any harder, so it is the control to reach for when one station is too loud against the others. It takes the same gestures as a knob; double-click returns it to 0 dB.
6 · Route an LFO to a knob
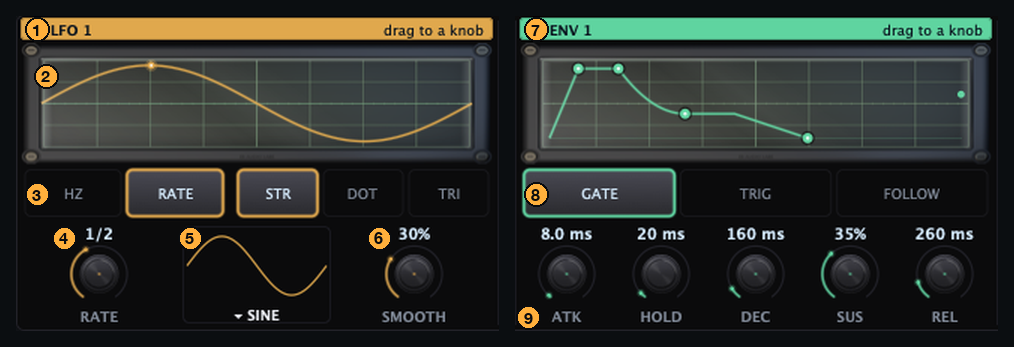
Focus GRANULAR and seat its CLOUD group. Drag the LFO 1 chip from the MOD band and drop it on POSITION. An arc appears on the knob: that is the route. Drag the arc’s end handles to set how far it reaches, drag the arc body to move the whole range, or double-click the arc to remove it.
Now shape the source. RATE chooses a tempo-synced division or, with HZ selected, a free rate; STR, DOT and TRI set the feel; the waveform picker offers the basic shapes, four drawn contours and CUSTOM, which you draw directly on the scope.
The same gesture works with ENV 1 and ENV 2, whose GATE, TRIG and FOLLOW modes decide how they react to your input, and with the X, Y and PROG chips on the VECTOR page. For depth, polarity, curve and combine mode, press ROUTES above the corridor: the inspector lists every route and says whether it is active.
7 · Scenes, morph and the vector
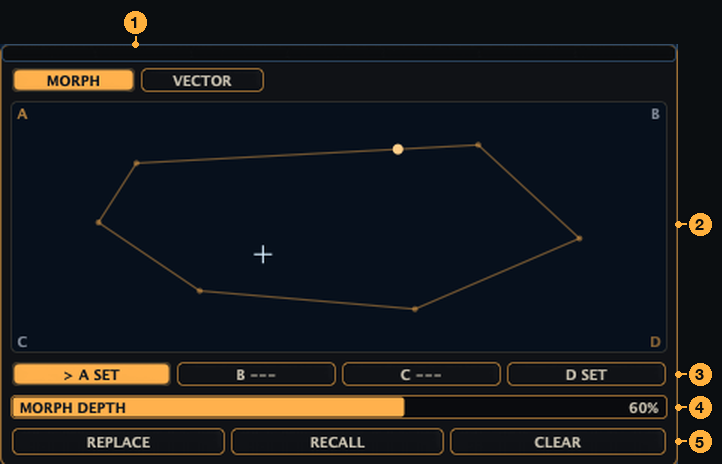
The MORPH page is already open on a fresh instance (if you closed it, press MORPH above the corridor). Select scene A and press STORE: the whole current patch is written into it. INIT already fills all four scenes, so on INIT the key reads REPLACE: it writes over the stored scene, and undo brings the old one back. Change a few things, select B, store again. Now drag the crosshair on the pad between them, and raise MORPH DEPTH to hear how far the blend reaches. RECALL jumps to a scene at full depth; CLEAR empties it.
On the VECTOR page, click empty space on the pad to place points. Two points make a path; the playhead travels it at the rate the clock row sets. Click a point to select it (it takes a ring) and double-click to deselect it; drag a point to move it, and alt-click or right-click it to remove it. Press LINK and the path drives the morph pad through two ordinary routes, which appear in the route list like any other. The X, Y and PROG chips can also be dragged onto any knob.
8 · Save it
Open the LIBRARY, type a name in NAME, press SAVE. The preset appears under USER and is written to Documents / COLLAGE Presets as a .clgpreset file, which you can copy to another machine and IMPORT there. SAVE OVER replaces the preset you loaded. RESET BLANK takes the whole instrument back to its neutral state when you want to start from nothing.
Concepts in plain words
- Station. One of the five processors. Each has PWR, WET, an output LEVEL and a ladder of control groups.
- Rack. The five stations in the order the cards show. Audio runs through them once, left to right.
- Control plane. Everything that moves a control without being audio. It is always on and never recorded.
- Route. One source moving one control, with a depth and a range. A patch can hold up to 128.
- Macro. A knob that a preset routes to many controls. THROTTLE, COLOR, GRAIN and DRIFT.
- Scene. A stored patch, one of four. The morph pad blends them.
- Vector. A path you draw that a playhead travels, publishing its position as a source.
- SPLIT and CROSS. SPLIT runs the rack as two parallel lanes; each card gets a LANE chip and CROSS blends the lanes.
- INIT and BLANK. INIT is the patch a fresh insert opens on. BLANK is the neutral instrument with no routes; RESET BLANK reaches it.
- Latency tier. SPECTRAL’s RESOLUTION tier sets the plugin’s latency. FAST, the default, is 819 samples; the tier is a session setting, not a performance control.
Reading the panel
COLLAGE has one look, DECK. Every state in the window also carries a word, never only a colour, and every control has a name and a description for screen readers.
Where to go next
- The Tutorials are seven hands-on sessions with real presets: macros, reordering, input followers, scenes, the vector and split lanes, step by step.
- The Technical Guide explains each station, the control plane, routing, determinism, latency and licensing in depth.
- The Glossary names every control on every surface and lists every parameter and control source.
- Questions and feedback: support@e8audiolabs.com. Include your OS, DAW, sample rate, buffer size, the preset and the steps.