COLLAGE tutorials
Seven short sessions, each built around one idea and each a few minutes long. They assume COLLAGE is installed and activated and that you have read the window tour in Getting started. Put COLLAGE on a track with audio playing (a drum part, a bass line or a pad all work) and keep the transport running while you follow along. Control names are written the way the panel spells them; the glossary describes every one, and the technical guide explains why each behaves as it does.
Three gestures come up again and again: drag a knob up or down to change it (hold Shift for fine changes), double-click a knob to restore its default, and drag a chip from the MOD band onto a knob to route that source there. The full list is in the glossary’s gestures table.
Some sessions start from INIT, the patch a fresh insert opens on. Others start from BLANK, the neutral instrument: every control at its default, no routes, the canonical rack order, and every station off but SPECTRAL. To reach either, press the preset name in the head band to open the LIBRARY. For INIT, select SYSTEM › INIT and press LOAD; for BLANK, press RESET BLANK. Then press CLOSE. Both are ordinary steps the undo lens can take back.
1 · Load a preset and move a macro
What you’ll learn. How to find and load a factory preset, and how one macro moves several controls at once.
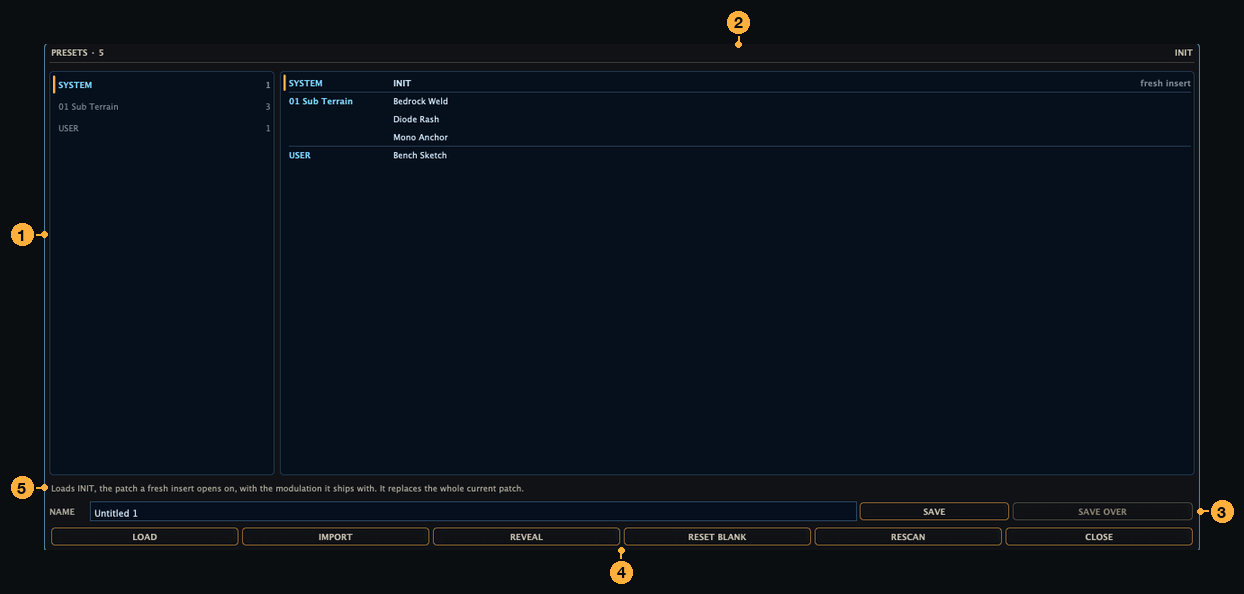
- Press the preset name in the head band. The LIBRARY opens over the corridor.
- In the bank list on the left, click 04 Cloud Chamber. The preset list jumps to that bank and selects its first preset.
- Click Ash Ceiling. The DETAIL strip under the list says what LOAD will do: load Ash Ceiling from 04 Cloud Chamber and replace the whole current patch.
- Press LOAD (double-clicking the row does the same), then CLOSE. The preset field now reads Ash Ceiling, and the cards show SPECTRAL and GRANULAR powered.
- Listen for a bar or two. GRANULAR’s PITCH sits at +12 st in this preset, so the grain cloud plays an octave above your input.
- Turn COLOR, the second of the four amber macro knobs in the apron, slowly up from 50 %. In Ash Ceiling, COLOR is routed to SPECTRAL’s TILT and to the head band’s HP: above 50 % the spectrum brightens and the high-pass rises; below 50 % the tilt darkens and the high-pass falls back.
- Double-click COLOR. It returns to 50 %, its resting point, where its routes leave every control exactly on its stored value.
What you should hear. The cloud sits above the input, and COLOR opens or closes the air over it, which is how the preset itself is described. One knob, two controls, in two different parts of the signal path.
Try next. Move the other three macros in the same preset. THROTTLE adds random pitch SCATTER to the grains; GRAIN thickens the cloud through DENSITY and SPRAY; DRIFT moves the grains’ PITCH and read POSITION. Then step to the next preset with the chevrons beside the preset name: every factory preset routes all four macros to something audible, so the same four gestures work everywhere.
2 · Reorder the stations
What you’ll learn. Why the order of the station cards is part of the sound, and that a reorder never leaves a gap and never changes the latency.
Start from INIT.

- Look at the station cards. INIT powers GRANULAR (card 2) and MANGLE (card 3), so the stream passes through the grain cloud first and the waveshaper second.
- Click the MANGLE card to focus it, and raise its WET to about 80 % so its shaping is easy to hear.
- Drag the MANGLE card to the left, past GRANULAR. A red marker shows where it will land; let go there. MANGLE is now card 2 and GRANULAR card 3.
- Listen. GRANULAR builds its grains from the last four seconds of its own input, and its input is now MANGLE’s output, so the grains are cut from the shaped sound instead of being shaped afterwards.
- Watch the head band while you drag the card back and forth: LATENCY stays at 819 samples in every order.
- Read the IN and OUT levels on each card. An output peak above unity is highlighted, which tells you which station is building up gain; its LVL strip under WET turns its processed signal down without changing how hard the effect is driven.
- Click the PLEAT card and press PWR. Power is a 10 ms fade on a station that has been running all along, so it comes in without a click and never starts from cold. Drag PLEAT to the front of the rack, then to the end, and compare.
What you should hear. The reorder itself has no hole in it: the seam crossfades toward the latency-matched dry signal and back. What changes is the instrument the same settings make. The same knob positions in a different order are a different patch.
Try next. Load Cathedral Powder (04 Cloud Chamber), where the grains run into SPECTRAL, which diffuses them into a large room. Drag SPECTRAL in front of GRANULAR and the grains are cut from the diffused spectrum instead. To hear one station on its own, focus it and press SOLO in the apron; SOLO is an audition and is never saved.
3 · Modulate GRANULAR from the input
What you’ll learn. How an envelope follower and an input follower turn the way you play into control, and how to add and edit a route in the CONTROL ROUTES inspector.
Start from BLANK.
- Click the GRANULAR card and press PWR. Raise its WET to about 70 %, and press CLOUD on the group ladder: SIZE, DENSITY and POSITION are in the well.
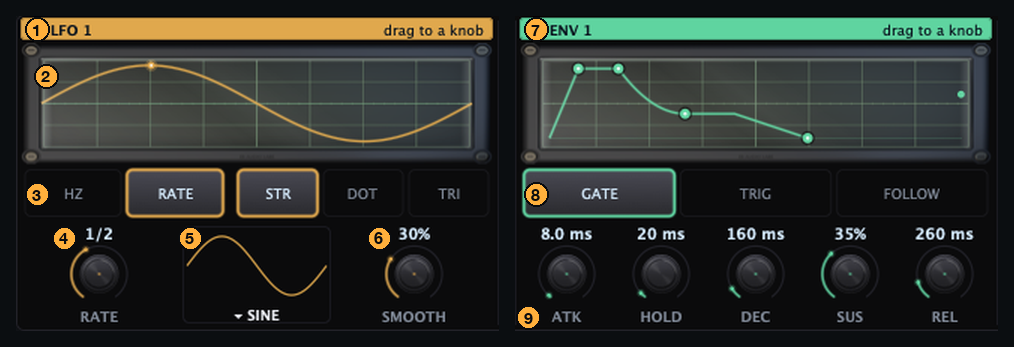
- In the MOD band, press FOLLOW in the ENV 1 slot. In FOLLOW mode the envelope tracks the level of your input, rising with a time constant set by ATK and falling with one set by REL (it covers 63 % of the way to the level in that time, and 99 % in about 4.6 times as long).
- Drag the ENV 1 chip (the bar that reads “drag to a knob”) onto DENSITY. An arc appears on the knob: that is the route, placed at a conservative depth over the middle of the knob’s range.
- Drag the arc’s upper end handle up, so the route can reach a thick cloud.
- Play louder, then softer. The cloud thickens when the input rises and thins when it falls.
- Press ROUTES above the corridor. The inspector lists your route as ENV 1 > Density. Press NEW, press SOURCE and choose INPUT / INPUT LEVEL, press TO and choose Spread, then press ADD. The status line reads “ACTIVE - INPUT LEVEL drives Spread.” Drag DEPTH to set how far the route reaches, then press CLOSE.
- Turn IN in the head band up and down. IN is the one gain that changes how the control plane hears you: every follower reads the trimmed input, so a hotter IN makes both routes reach further.
What you should hear. Louder playing thickens the cloud and widens it across the stereo field; quieter playing thins and narrows it. DENSITY is level-matched from about 2 overlapping grains upward, so the cloud grows thicker, not louder. The followers carry no audio anywhere: they measure your input and move two knobs, and that is all they do.
Try next. Try ENV 1’s other modes: GATE holds the envelope open while the input is above the threshold, and TRIG fires one shot per transient. Load Strike Garden (09 Reactive Matter), where ENV 1 in TRIG mode drives the cloud’s DENSITY and SCATTER, so every hit plants a burst of grains that decays into the next one. Load Hiss Bloom (04 Cloud Chamber), where INPUT NOISE drives DENSITY and the input’s own noise floor decides how thick the cloud becomes. And for a sidechain, Sidechain Bloom (09 Reactive Matter) sets ENV 1 to listen to the SC tap, so a kick on COLLAGE’s sidechain input ducks the bloom and the space between hits fills with it; an envelope’s tap is chosen from the host’s parameter list (Env 1 Source).
4 · Move the whole rack with THROTTLE, COLOR, GRAIN and DRIFT
What you’ll learn. What the four macros do in INIT, how to set a macro in motion with an LFO, and how a preset can hang the whole rack on one knob.
Start from INIT.
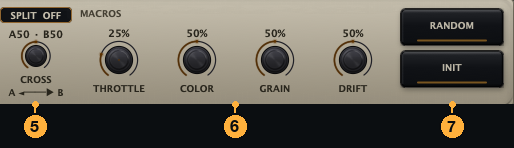
- Find the four amber macro knobs on the right of the apron. INIT has THROTTLE at 25 % and the other three at 50 %, their resting points.
- Push THROTTLE to 100 %. GRANULAR’s DENSITY climbs and MANGLE’s DRIVE gets harder. Both are level-compensated, so THROTTLE changes the texture and the edge rather than the level. Pull it back to 0, where THROTTLE rests and its routes leave both controls on their stored values.
- Turn COLOR above and below 50 %. It moves MANGLE’s SHAPE and the TILT of each grain’s envelope, which front-loads the grains’ attack on one side and swells into them on the other.
- Turn GRAIN. It changes the grains’ SIZE and their SPRAY, the random spread of where each grain reads from.
- Turn DRIFT. It moves the grains’ read POSITION and transposes their PITCH, up or down from the centre.
- Drag the LFO 2 chip from the MOD band onto DRIFT. DRIFT now moves by itself, and everything DRIFT drives moves with it in the same instant. Set LFO 2’s RATE to 2 BAR for a slow sway. When you have heard enough, double-click the arc on DRIFT to remove the route.
What you should hear. Each macro is one gesture across two controls, and with an LFO on a macro the whole group moves together, in time with the host.
Try next. Load The Big Lever (16 Performance Systems), described as one lever with everything attached. Its THROTTLE sweeps all five stations at once (SPECTRAL’s BLUR, GRANULAR’s DENSITY, TIME’s WEAVE, MANGLE’s DRIVE and PLEAT’s FOLD), each through a SPAN route, which sweeps from the route’s MIN to its MAX as the macro rises. To give a macro a target of your own, open ROUTES, choose a source such as MACRO / THROTTLE, an audible destination, and press ADD. A macro may not drive another macro. The route settings are explained in the glossary’s route settings table.
5 · Store four scenes and morph between them
What you’ll learn. How to store whole patches as scenes A to D, and how the morph pad and MORPH DEPTH blend them.
Start from BLANK.
- Click the GRANULAR card, press PWR, and raise its WET to 100 %.
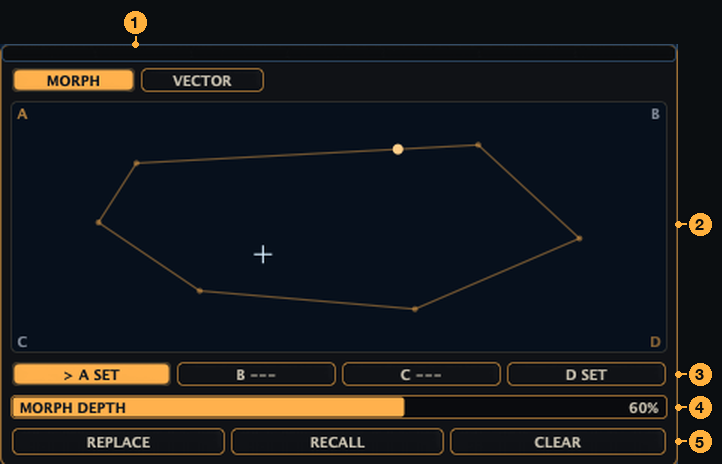
- If the MORPH panel is not open, press MORPH above the corridor. The depth strip under the scene chips reads MORPH OFF · RAISE DEPTH: at zero the morph is off, the scenes are silent and the crosshair moves nothing. Leave it there while you store.
- Scene A. Press CLOUD on the group ladder; set SIZE to about 20 ms and DENSITY to about 16. Click the A chip and press STORE. The chip now reads SET.
- Scene B. Set SIZE to about 400 ms and DENSITY to about 2. Click B and press STORE.
- Scene C. Press PITCH on the ladder and set PITCH to −12 st. Click C and press STORE. STORE writes the whole current patch, so scene C keeps B’s long, sparse grains and adds the octave down.
- Scene D. Press MOTION and set REVERSE to 100 %. Click D and press STORE.
- Drag the depth strip to 100 %; it now reads MORPH DEPTH. Now drag the crosshair on the pad: A is the top-left corner, B top-right, C bottom-left, D bottom-right, and the centre blends all four evenly.
- Click a chip and press RECALL: the morph moves onto that scene at full depth. To drop a scene, select it and press CLEAR; the morph then blends only the scenes that remain.
- Set MORPH DEPTH to 50 %. The controls now sit halfway between the patch on the knobs and the blend the pad points at.
What you should hear. The whole patch moving as one shape. The blend weights glide over 25 ms, so a jump across the pad is a quick glide rather than a click. Quantised selectors (GRANULAR’s SCALE, for one) and structural settings such as power never morph.
Try next. With MORPH DEPTH up, turn a knob: the edit is heard one for one, and the stored scenes take it up in proportion to how much each is contributing, so standing on a corner puts the whole edit into that scene. Over a stored scene the STORE key reads REPLACE; undo brings the old scene back. Then load Four Scene Theatre (16 Performance Systems), where four acts stored in the corners are performed in order by a VECTOR path, which is the next tutorial.
6 · Draw a VECTOR path
What you’ll learn. How to draw a path for the morph to travel, link it to the scenes, and shape its clock.
Continue from tutorial 5: store the four scenes again if you cleared one, and set MORPH DEPTH back to 100 %.
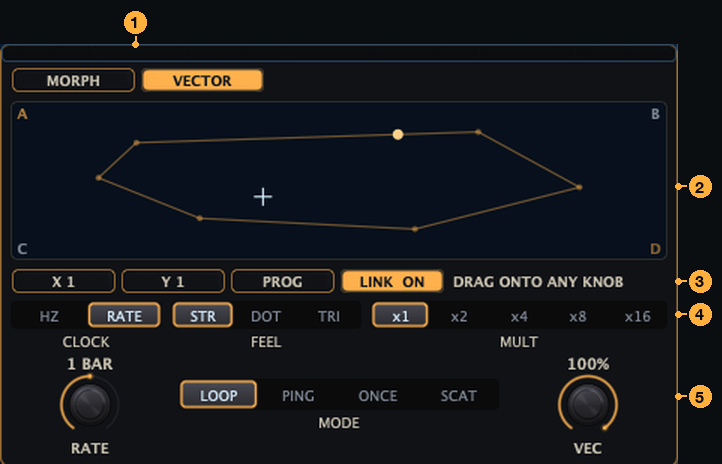
- Press VECTOR at the top of the panel. The pad is the same; the rows beneath it change to the X, Y and PROG chips, LINK, and the vector clock.
- Click empty space near corner A to place a point (a click right on the crosshair takes the crosshair instead). One point is not a path yet, and the panel says one more point makes a vector.
- Click near corner D. Two points make a path, and the playhead starts to travel it, one lap per bar: RATE reads 1 BAR, MODE LOOP.
- Press LINK. COLLAGE adds two ordinary routes, vector X to morph X and vector Y to morph Y, and the ROUTES count in the head band goes up by two. The morph now follows the playhead from A to D and back, every bar.
- Click near corner B, then near C. New points are added at the end of the path, and the playhead gives every segment the same time, so the order you placed the points in is the figure’s rhythm.
- Shape the clock. MULT x2 halves each lap; FEEL gives the synced lap a dotted or triplet length; RATE runs from a quarter bar to four bars per lap. Try each MODE: PING runs the path back and forth, ONCE runs it a single time and rests at the last point, SCAT jumps between the points in a seeded order.
- Turn VEC down. The path shrinks toward the centre of the pad; at 0 it parks there.
- Edit the figure: click a point to select it (it takes a ring), drag it to move it, alt-click or right-click it to remove it, and double-click to deselect.
- Drag the PROG chip onto a knob, GRANULAR’s SPREAD for example. PROG reports how far along the path the playhead is, so the knob follows the playhead’s progress around the figure.
What you should hear. The patch travelling through your four scenes in the shape you drew, locked to the host tempo. With the clock on RATE the path is synced, so it lands the same way from any bar of your song. To take the link away, remove its two routes in ROUTES.
Try next. Load Figure Eight (07 Vector Fields): eight points in LOOP mode at x2, which trades a dry lobe against a diced one on every pass. Load Scatter Atlas (07 Vector Fields) to hear SCAT jumping between four scenes.
7 · Split the rack into two lanes
What you’ll learn. How SPLIT runs the stations as two parallel lanes, how the LANE chips assign them, and how CROSS blends the lanes.
Start from INIT.
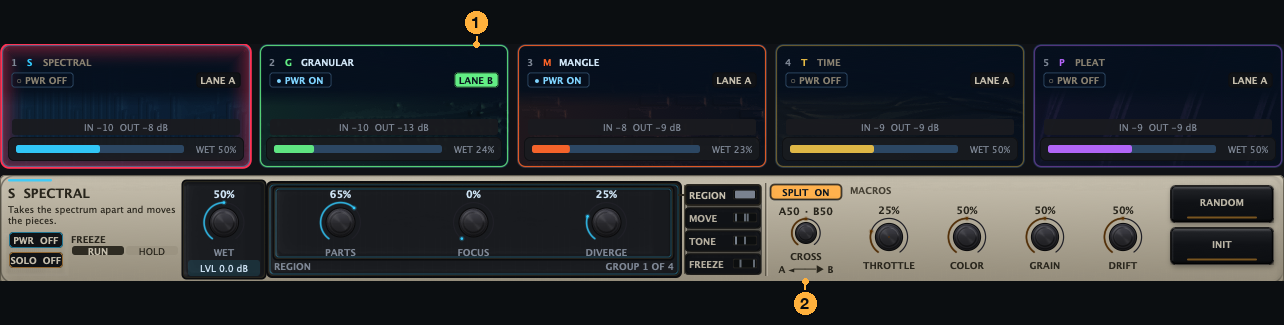
- Press SPLIT in the apron; it reads SPLIT ON. Every station card gains a LANE chip, and all of them read LANE A. While every station is on lane A, lane B carries the rack’s own input, delay-matched to lane A, so CROSS blends the processed rack against that aligned dry signal.
- Turn CROSS. Its value names both lanes: A100 · B0 is the rack alone, A0 · B100 is your dry input, and the default A50 · B50 is half of each.
- Click the LANE chip on MANGLE’s card. It reads LANE B. GRANULAR is now the only powered station on lane A and MANGLE the only one on lane B; each lane runs its stations in rack order, and CROSS blends the two lanes.
- Drag the LFO 1 chip onto CROSS. The blend sways between the lanes at LFO 1’s rate. CROSS is smoothed, so it can be modulated as freely as any other knob.
- Watch LATENCY in the head band: it does not change when you split the rack or move a station between lanes.
- Press SPLIT again to run the rack as one serial chain.
CROSS is shown in the apron when the window is at least 1280 wide; the default window, 1300 × 878, is. The SPLIT latch is there at every width.
What you should hear. With MANGLE on its own lane, the grain cloud and the shaped signal sit side by side instead of one passing into the other, and CROSS chooses how much of each you hear.
Try next. Load Dry Rail Wet Rail (14 Cross Currents): MANGLE alone on lane A, SPECTRAL and GRANULAR on lane B, CROSS at A65 · B35, and DRIFT routed to CROSS, so one rail is barely touched, the other soaked, and the crossfade is the whole mix knob. Fast Lane Slow Lane (14 Cross Currents) puts MANGLE on lane A and TIME on lane B: the same beat at two speeds, side by side.
Where to go next
- The technical guide explains what each station does under the panel, how routes are evaluated, and why every render is the same at any host block size.
- The glossary lists every control, every parameter with its host name, and every control source a route can read.
- Questions: support@e8audiolabs.com. Include your OS, DAW, sample rate, the preset and the steps.