TEMPER technical guide
This guide describes what each part of TEMPER does and how it behaves in your session. For the controls one by one, with their ranges, see the glossary.
Programs and pages
A program is one complete instrument: how it is played, what it is made of, its material pad, its four macros, its modulation and its effects rack. The page is drawn for the instrument the program plays, and only the controls it uses are shown. A control the sound does not use is hidden, and its value stays in the program.
- The playing card is named for what plays the note, and follows your choice: Finger, Pick, Nail or Tsume on a plucked string, Bow, Hammer on a struck string, Mallet on a bar, plate, drum or bell, and Breath or Rattle on the programs played that way.
- The instrument card is named for the part that sounds: String, Bar, Plate, Gong, Cymbal, Drumhead, Bell or Bowl, or Hybrid where a string and a surface sound together.
Each program shows a photoreal picture of its own instrument. The picture marks the point where the note is played; dragging it moves the pluck, strike or bow point, the same as the Where or Strike point slider.
The factory library holds 115 programs in fourteen families. The getting-started guide lists them with their program numbers.
The material pad
Every factory program has a material pad with two named axes and four named corners, each corner a variation of the same instrument. On Acoustic Bass Guitar the horizontal axis is Touch and the vertical axis Mute, and the corners are Fingers, Picked, Muted and Thump.
- Home is the lower-left corner, and it is the program exactly as voiced. Every corner stays near home in level and pitch.
- The mod wheel moves the vertical axis, Material Y.
- On a string, a note takes the blend in force when it starts, and held notes keep theirs. On a bar, plate, drum or bell, sounding notes follow the blend as it moves.
- Keyswitches. The four lowest keys of the keyswitch lane choose a corner instead of playing: MIDI note 12 home, 13 the horizontal corner, 14 the vertical corner and 15 the far corner. The next note plays that corner; notes already sounding move to it smoothly. The keyswitch does not move the pad’s controls, so your automation is unchanged. Keyswitches turns the lane off and Keyswitch Base moves it. Logic Pro’s Articulation Sets and Cubase’s Expression Maps can send them for you.
Macros
Each program has four macros, named for what you hear, on the front panel under the playing controls and again on the Modulation page, where each says what it moves. At 0 a macro leaves the program as voiced. On some programs, most bowed strings among them, the mod wheel also turns the first macro; the Macros row marks it with a small wheel.
Release and the sustain pedal
Release, on plucked and bowed strings, decides what your hand does when you lift the key. At stopped, the default on every program, a hand comes down on the strings, so a guitar, bass or lute note stops in a fraction of a second and a bowed note fades quickly once the bow leaves the string. Toward let ring the hand lands more lightly; at let ring nothing is damped. Release changes only what happens after the key comes up. The sustain pedal holds every note, whatever Release says.
Tuning and scales
- Tuning: Anchored or Free. Anchored keeps every note on its target pitch, and it checks the instrument’s tuning in the background after you change it. Free lets the instrument’s body pull the pitch, as a real instrument’s does.
- Quality: Eco, Normal or High. Higher quality resolves more detail for more CPU. Every factory program uses Normal.
- The Scale menu (the header’s SCALE button) shows the tuning in force and changes it.
- Load scale reads a Scala
.sclfile or an Ableton Live 12.asclfile; Load keyboard map adds a Scala.kbm; Clear removes them. - Without a keyboard map, key 60 is the scale’s first degree and key 69 sounds at the A4 Reference (400 to 480 Hz, 440 by default).
- The tuning belongs to this instance, not the program: it stays when you change programs and is saved with your project.
- MTS-ESP. With an MTS-ESP master running, TEMPER follows its tuning, including on notes already sounding. This works in the plug-ins; the standalone app uses Scala files.
- Follow chooses the source: Auto uses a loaded Scala tuning first, then an MTS-ESP master, then the program’s own tuning.
- Load scale reads a Scala
- Some programs carry a scale of their own: Slendro or Pelog on the gamelan instruments, and a Pythagorean tuning on the Koto.
Voices and play modes
- Voices. Up to 64; each program sets its own number, 16 for most.
- Poly plays every key as its own note. Mono plays one note at a time and glides between them: Legato only glides between overlapping keys, Always glides on every note. The glide time is under Bend on the Modulation page’s Hands, and on the keyboard strip in Mono.
- Transpose (±24 semitones) and Fine (±100 cents) shift the whole instrument. Some programs sound away from the key, as their real counterparts do; Transpose shows it.
Expression and MPE
- Velocity sets how hard each note is played; release velocity how firmly it is damped. On bowed programs velocity sets the bow’s Dynamics and Colour.
- Controllers. Channel and polyphonic pressure, CC74 (slide), the mod wheel (CC1), breath (CC2), foot (CC4), expression (CC11), sustain (CC64) and two assignable controllers (CC16 and CC17 by default). Each controller number can be changed.
- MPE is on by default, in the lower zone: channel 1 is the master and channels 2 to 16 are members, each note with its own bend, pressure and slide. The member bend range is 48 semitones by default; a controller can set its own with RPN 0. MPE Zone switches to the upper zone, and a controller that sends an MPE configuration message sets the zone itself.
- A keyboard on a member channel is recognised when it plays chords on one channel, and its wheel then bends every note at the ordinary bend range.
- Note Expression (VST3, in Cubase and Nuendo): Tuning, Brightness and Pressure, per note.
- In Ableton Live, turn on MPE mode in the device’s context menu. In Logic Pro, set the instrument’s MIDI Mono Mode on, with base channel 1 and a pitch range of 48.
The Modulation page
Modulation ↗ opens one full-screen page with four areas.
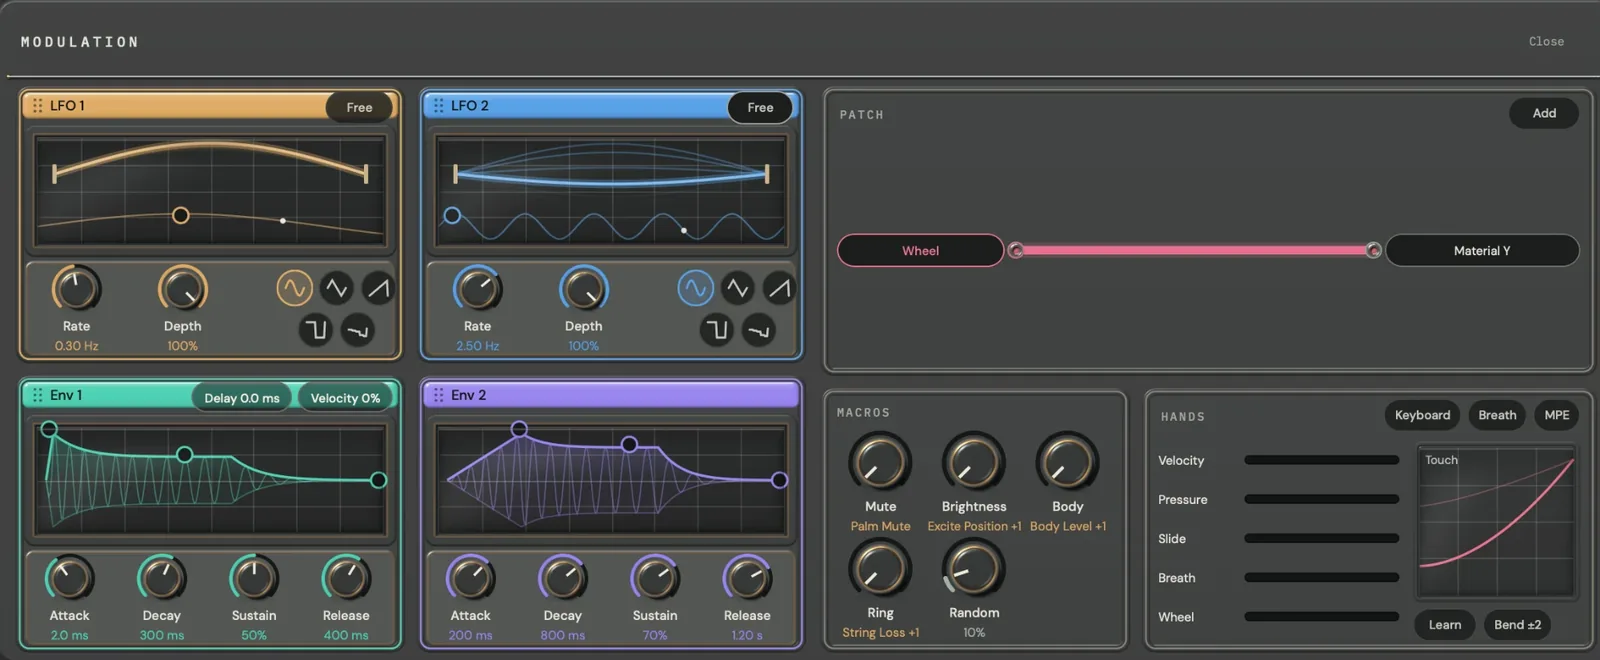
- Sources. LFO 1 and LFO 2 (0.01 to 20 Hz, or synced to the host’s tempo, with five shapes) and Env 1 and Env 2 (attack, decay, sustain and release; Env 1 adds a delay and velocity). Each is drawn live, with points you can drag, and each has a coloured header you drag to make a route.
- Patch. Up to 16 routes, each drawn as a cable from a source to a target. The cable’s thickness is the amount, and it trembles with the live value. Drag a cable to change its amount; click it to set its source, target, amount and curve (Linear, Log, Exp or S), to mark it Primary, to learn a controller, or to remove it.
- Macros. The four macros, each with what it moves, and per-note Random.
- Hands. Live meters for velocity, pressure, slide, breath and the mod wheel, each with its settings; the controller sets Keyboard, Breath and MPE; the Touch curve; Learn; and Bend, with the bend range, the MPE bend range and the glide time.
Controller sets. Keyboard suits a MIDI keyboard with a mod wheel. Breath suits a breath or wind controller on CC2: breath plays the note and the instrument plays one note at a time. MPE suits an MPE controller, with pressure and slide on every note. A set replaces the routes; change any of them afterwards.
Primary. A route from a continuous controller, such as breath, can be marked Primary. A key then sounds only once that controller rises, and the controller plays the note for as long as it sounds, as breath plays a wind instrument.
The Stage
The Stage page seats sections of players. One TEMPER track is one section; every TEMPER section in a project sits on the same stage, in the same hall, heard from the same seat.
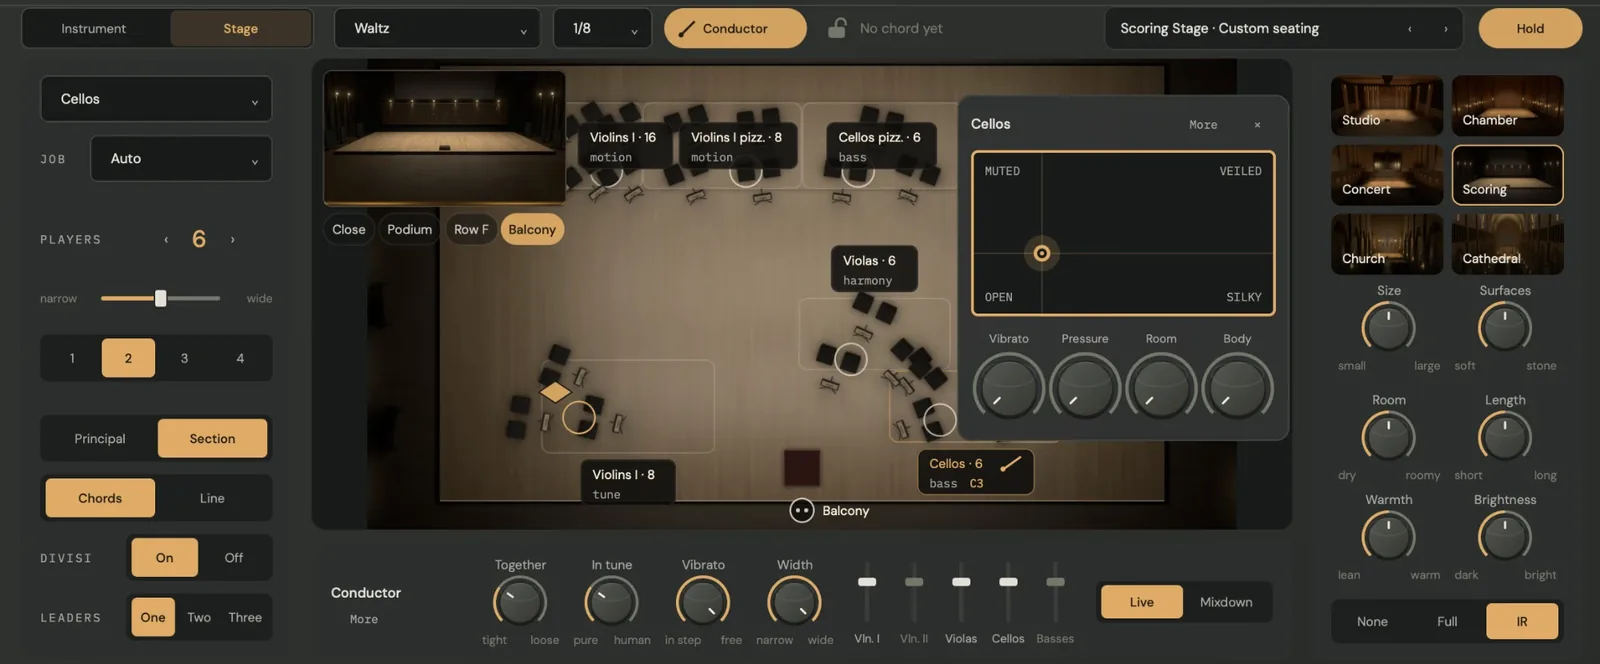
Sections. Players (1 to 16) turns a bowed or plucked program into a section. Players 1 is the instrument alone. Every player has their own instrument, tuning and timing, and follows the principal as a section follows its leader. A section sits at the level of one player, so adding players does not make the track louder.
This section (left):
- Section chooses the seat: Violins I, Violins II, Violas, Cellos or Basses for the strings, Guitars I, Guitars II or Bass Guitars for the guitars, or Solo, in front. The menu offers only the seats your instrument can take.
- Job, while the stage has a texture (below).
- Players, the spread from narrow to wide, and the number of rows (1 to 4).
- Principal alone, or the whole Section.
- Chords or Line: in Line every player takes the newest note, for melodies.
- Divisi: On shares a chord out among the players; Off puts every player on every note up to a double stop.
- Leaders: One, Two or Three front players in full detail. More leaders use more CPU.
The seating chart (middle) shows every track in its own place, its desks lit as its players play, with a label for the section, its size, its job and the notes it plays. Drag your track’s brass diamond to move it, or onto another track to swap the two. Click a section’s desks for its sound card. The picture in the corner is the hall from your seat: Close, Podium, Row F or Balcony. Nearer seats hear more of the players and less of the hall.
The conductor (below the chart): Together (tight to loose), In tune (pure to human), Vibrato (in step to free) and Width (narrow to wide), a level fader for each section, and the timing. Live adds no latency: the principal plays on the beat and the others around it. Mixdown plays the section early by a fixed latency your host compensates, so its notes land on the beat.
The hall (right): Studio, Chamber, Concert, Scoring, Church or Cathedral. Size and Surfaces (soft to stone) change the room; Room (dry to roomy), Length (short to long), Warmth (lean to warm) and Brightness (dark to bright) shape how it sounds. The tail is None (the early reflections only, for your own reverb), Full or IR.
The stage bar (top): Orchestrate’s texture and rate, the Conductor chip, the chord and key with the padlock, the stage preset (the hall and a seating plan: Standard, Antiphonal, Chamber or Centred) and Hold, which keeps the stage while you browse programs.
Sharing. Some hosts run each plug-in in its own process, so their tracks cannot share one stage; each track then keeps its own copy, so set the hall alike on each.
Orchestrate
Orchestrate turns one played line or chord into a part for every section on the stage. Each section hears the same notes, works out the same arrangement and plays its own part, so nothing lags and the bounce matches what you heard. Each section needs at least two players.
- The conductor. Choosing a texture on a track makes it the conductor: the stage arranges what that track plays. Other tracks’ own clips play as written beside their parts.
- Textures. Chorale, Flowing, Pulse, Driving, Waltz, Tremolo, Answer, Counter-melody and Strum (the guitars’ texture). Each gives every section one job: the tune, the harmony, the bass, motion or a counter-melody. Off plays exactly what you play.
- Rate sets how fast the moving layer moves, from 1/4 to 1/32 with triplets, following the song’s tempo.
- Job overrides a section’s part: Auto, a forced job, As written (only this track’s own notes) or Silent.
- The chord and the key. The stage bar reads the chord and the key. The key is a guess until you click the padlock. A chord takes the notes you press together, so the sections play about 30 ms behind the keys; TEMPER reports this to your host, so recorded parts stay on the beat.
Texture, rate and the key are the stage’s: change them on any track and every track follows. The conductor and each track’s job are its own.
The effects rack
Effects ↗ opens the rack, which follows the instrument.
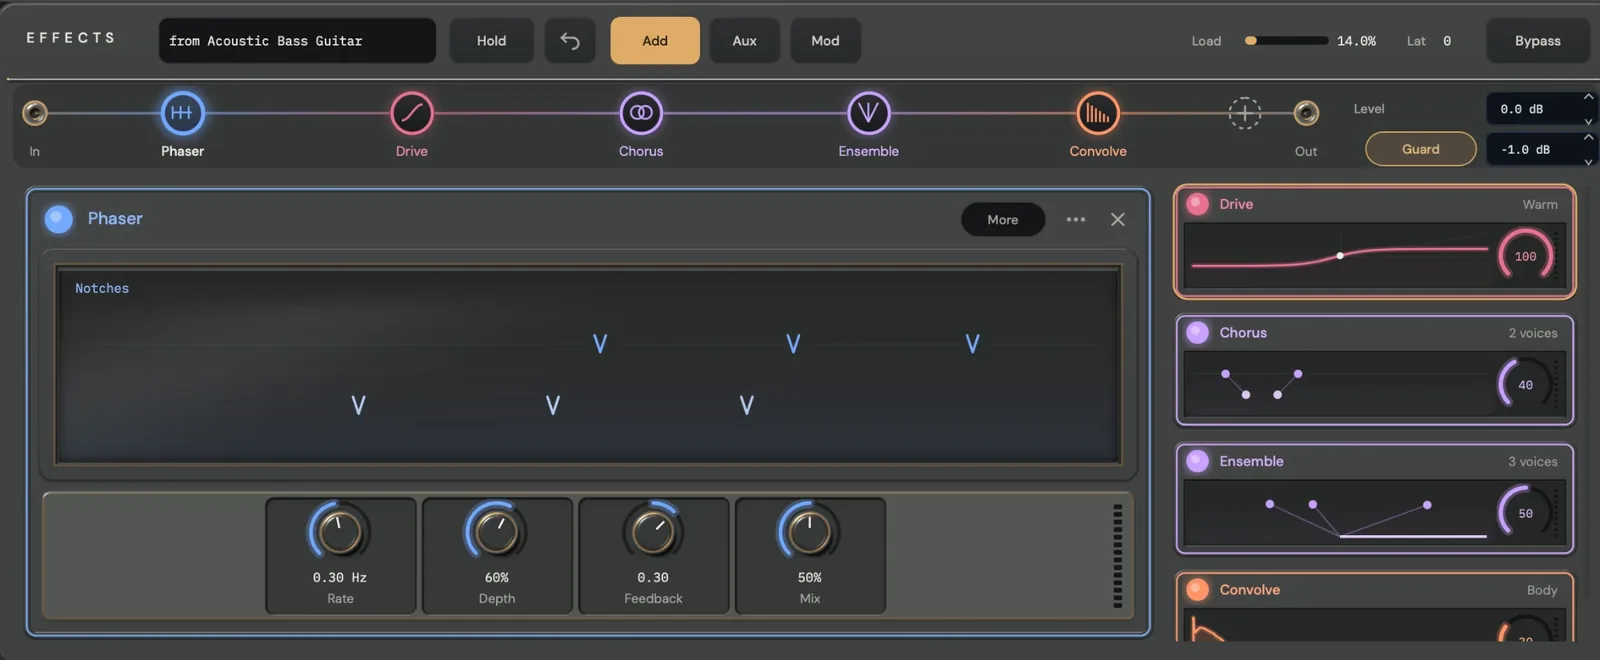
- The rail. In, the modules in order, Out. Drag a node to reorder it. Up to 16 modules from eleven types: EQ, Drive, Grains, Delay, Reverb, Chorus, Ensemble, Phaser, Comp, Shift and Convolve. EQ, Drive, Grains, Delay and Reverb can each appear twice.
- The selected module opens on one large graph above its knobs. Drag on the graph where it offers handles, such as the EQ’s bands; double-click a handle to reset it. More holds the module’s other controls.
- Tiles. The other modules, each with a live picture, a mix ring and an output meter.
- The toolbar. The rack preset field (the nine factory racks, Load, Save and Save with audio), Hold (keep this rack while you browse programs), Undo, Add, Aux (a parallel lane between a send and a return), Mod (16 rack routes: drag a source onto a knob), the rack’s Load and latency, and Bypass.
- Level and Guard. Level sets the rack’s output, −24 to +12 dB. Guard limits the output at its ceiling, −12 to 0 dB and −1 dB by default.
The product page lists every module’s controls, ranges and modes.
Latency
TEMPER reports its latency to your host, which compensates for it. A factory program adds none on its own; latency comes with Mixdown timing on the Stage, with Orchestrate, with the Drive’s Oversample and with the Comp’s Lookahead. A program change or a restored session reports the new latency straight away.
TEMPER FX and audio input
TEMPER FX puts the instrument on an audio track: your audio plays it.
- Input mode. Free Running keeps the instrument ringing under the input at all times, tuned to the program’s root, with no MIDI needed; play notes on top to add more. MIDI Gated lets the input sound only through the notes you hold.
- The input’s trim sets how hard the audio plays the instrument, and Dry mixes in the unprocessed input, aligned in time.
In TEMPER, the instrument, an optional stereo input (off by default; switch it on in the playing card’s More) excites only the notes you hold. Released notes ring out without it, and with no note held the input is silent.
Presets, sessions and your DAW
- Presets are saved from the Library to
~/Library/Audio/Presets/E8 Audio Labs/TEMPER. A preset stores the whole program, its effects rack included. - Sessions store the whole program, so a project reopens with exactly the sound it had, along with the tuning and the stage.
- Host programs. In the Audio Unit and standalone versions the factory programs are also the plug-in’s programs, so your host’s program menu selects them. The VST3 version shows the host one program, so a clip’s program change cannot replace your sound; choose programs in TEMPER’s Library.
- Automation. Every control your host automates moves on screen. Opening a page or a drawer never changes a value.
- Program numbers changed with the 115-program library. A session that stored the whole patch, as hosts normally do, restores its sound exactly.
Troubleshooting
| Symptom | What to do |
|---|---|
| TEMPER does not appear in the host | Rescan plug-ins. Check that no older copy sits in your own ~/Library/Audio/Plug-Ins. |
| No sound with audio routed into TEMPER | The input plays only the notes you hold. Play a note, or use TEMPER FX in Free Running. |
| TEMPER FX is silent | MIDI Gated needs a held note. Check the input’s trim and that the host feeds the input. |
| A breath program is silent | Its breath route is Primary: notes sound only when breath (CC2) rises. |
| Sections on different tracks hear different halls | The host runs each plug-in in its own process. Set the hall alike on each track. |
| The output sounds squashed | Guard is catching a hot signal. Lower the rack’s Level or the program’s level. |
| The preset name shows a dot | The program has unsaved changes. Save a user preset, or reload it. |
| High CPU | Use Eco or Normal quality, lower the voices, use fewer Leaders on a section, or bypass the reverb. |
Support: support@e8audiolabs.com. Include your DAW and its version, the sample rate and buffer size, the plug-in format and the program.